Handover Process
This procedure guide explains how to use the Client Handover feature to transfer documents and organizational access to new users or organizations. The handover process allows administrators to securely transfer files and create new organizations for recipients.
Table of Contents
Section titled “Table of Contents”- Accessing the Handover Feature
- Starting a New Handover
- Selecting Documents
- Adding Organization Information and Saving Draft
- Starting the Handover Process
- Reviewing Selected Files
- Setting Up Organization Information
- Creating the Organization and Sending Invitation
- Confirming Document Handover
- Managing Draft Handovers
- Viewing Handover History
- Key Features Summary
- Best Practices
- Troubleshooting
- Security Notes
Accessing the Handover Feature
Section titled “Accessing the Handover Feature”Step 1: Navigate to Admin Dashboard
Section titled “Step 1: Navigate to Admin Dashboard”- Log in to the application with admin privileges
- Navigate to the Admin Dashboard (typically accessible from the main navigation menu)
- The dashboard displays several cards showing statistics and quick access to different admin features
Step 2: Access the Handover Feature
Section titled “Step 2: Access the Handover Feature”You can access the handover feature in two ways:
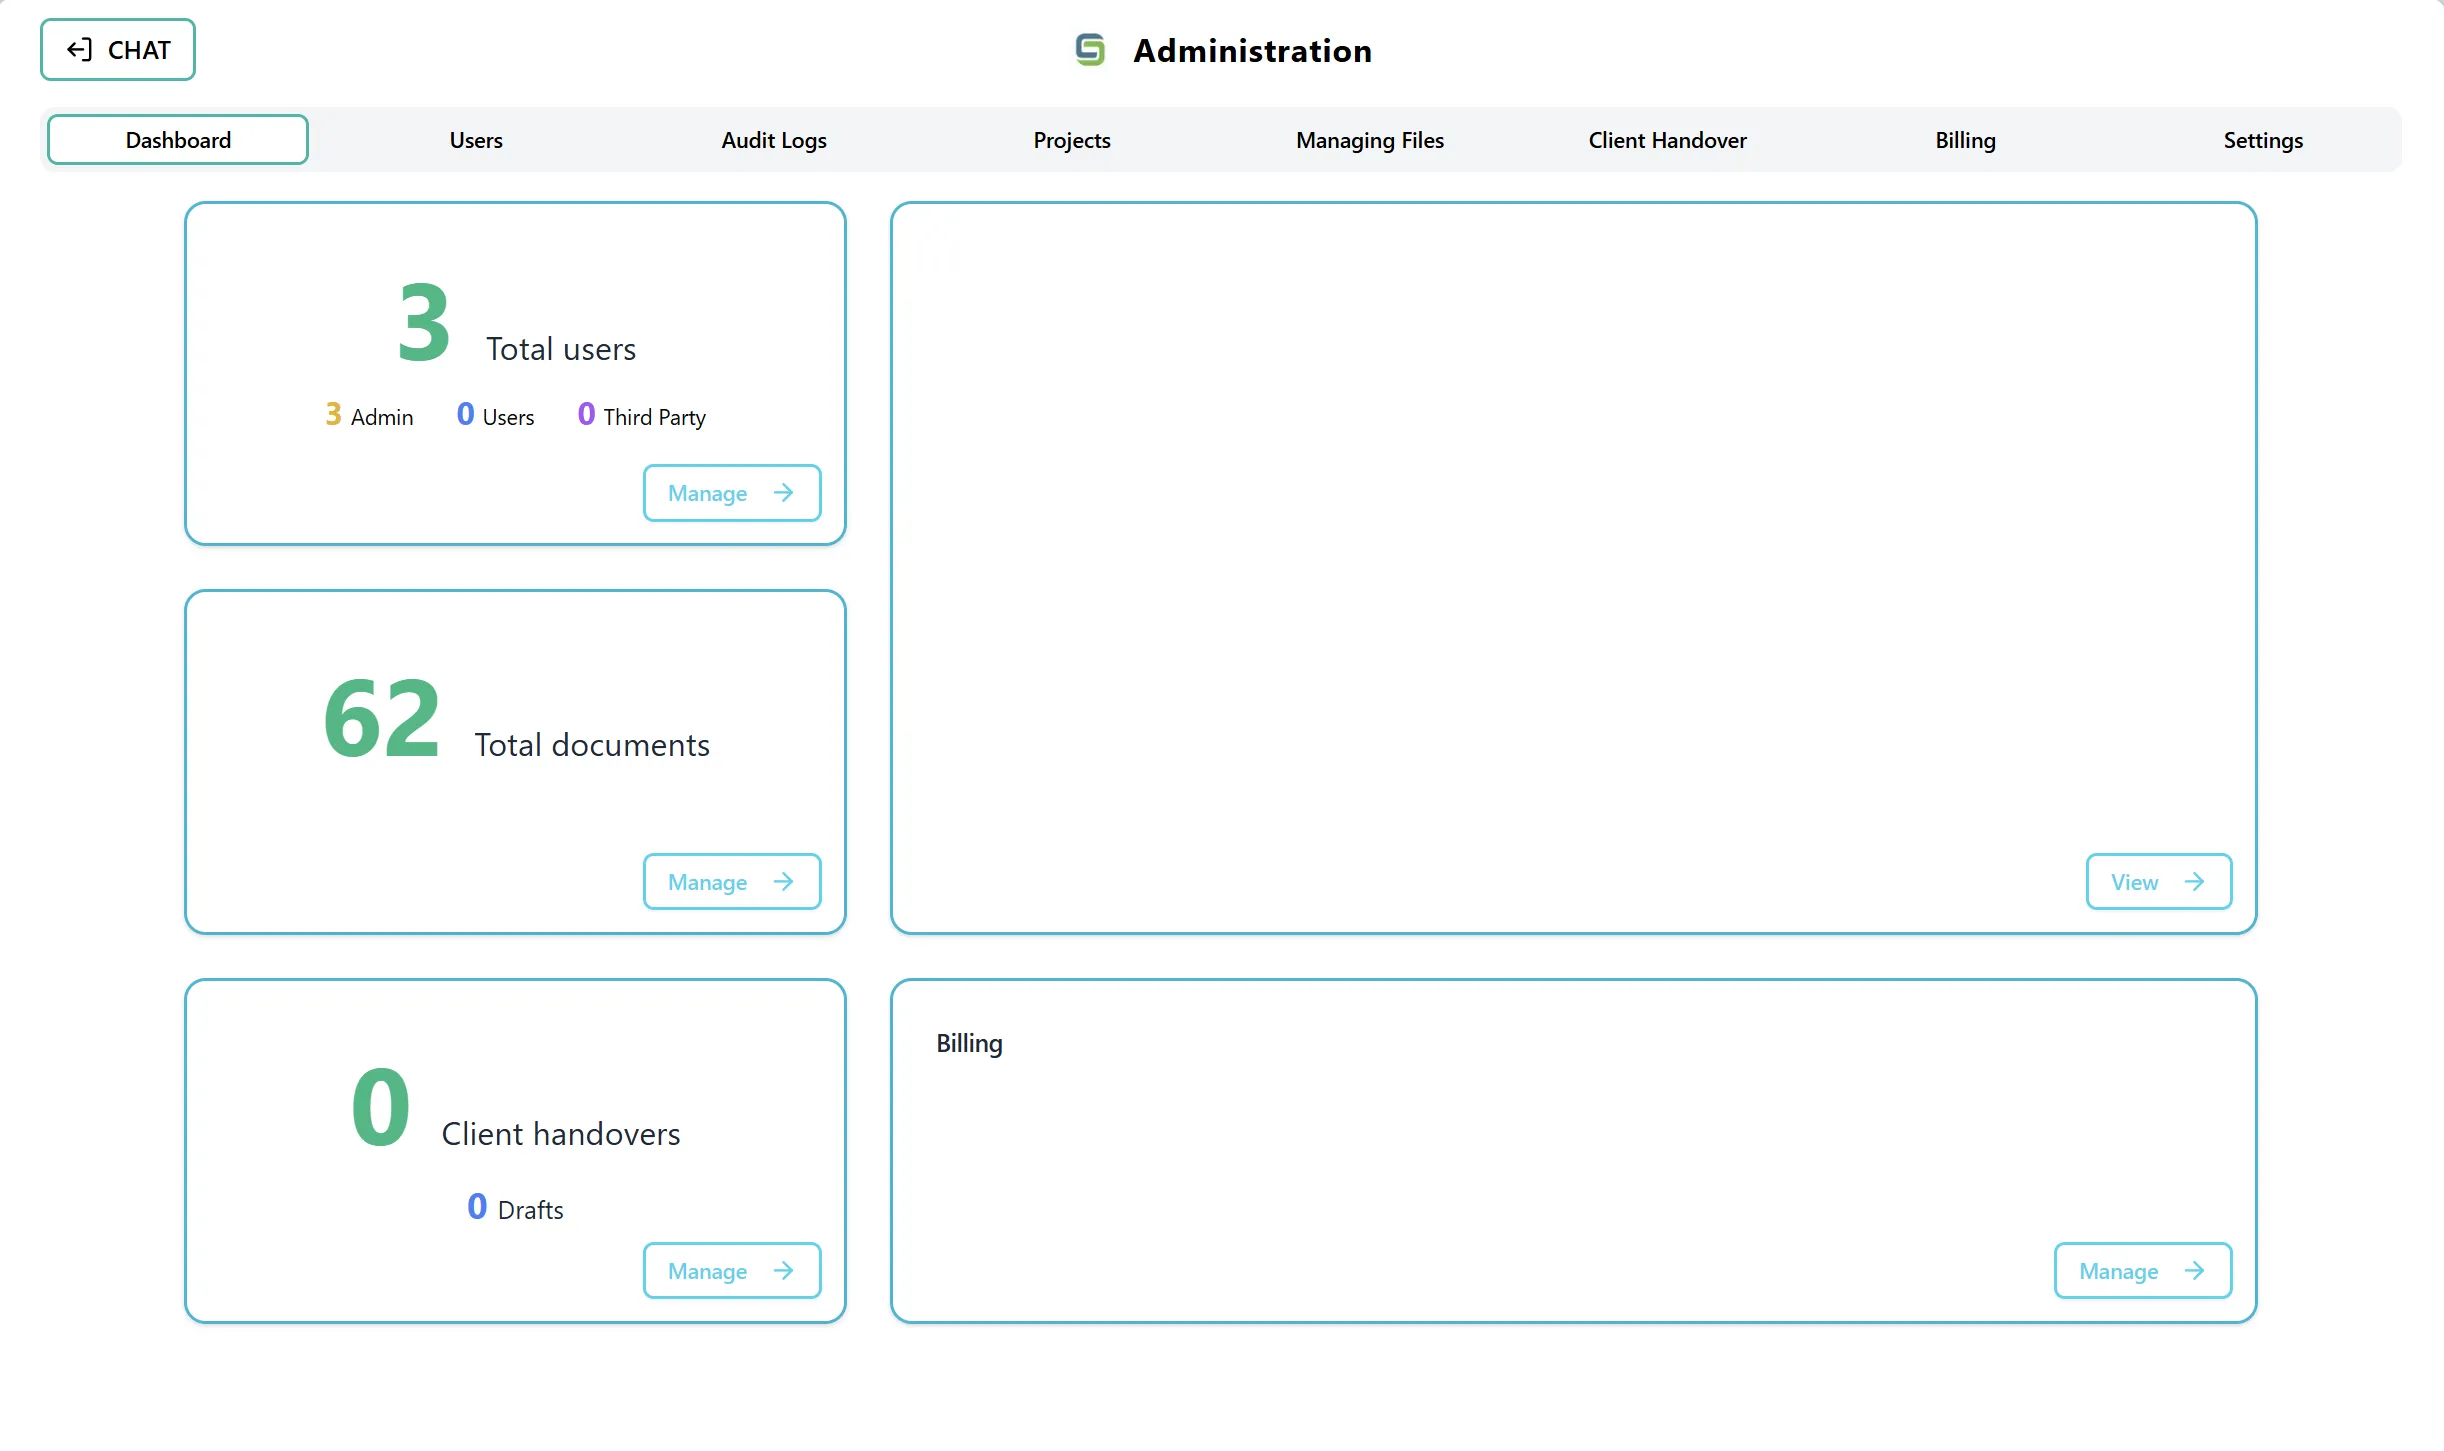
Option A: Using the Handover Card On the Admin Dashboard, you will see a card labeled “Client Handover Records” or “Handover Records” that displays:
- Total number of completed client handovers (in green)
- Number of draft handovers (in blue)
- A “Manage” button in the bottom-right corner
Option B: Using the Navigation Tab You can also directly select the “Client Handover” tab from the top navigation tabs in the Admin section. This tab is located alongside other admin sections such as Dashboard, Users, Audit Logs, Projects, and Managing Files.
Starting a New Handover
Section titled “Starting a New Handover”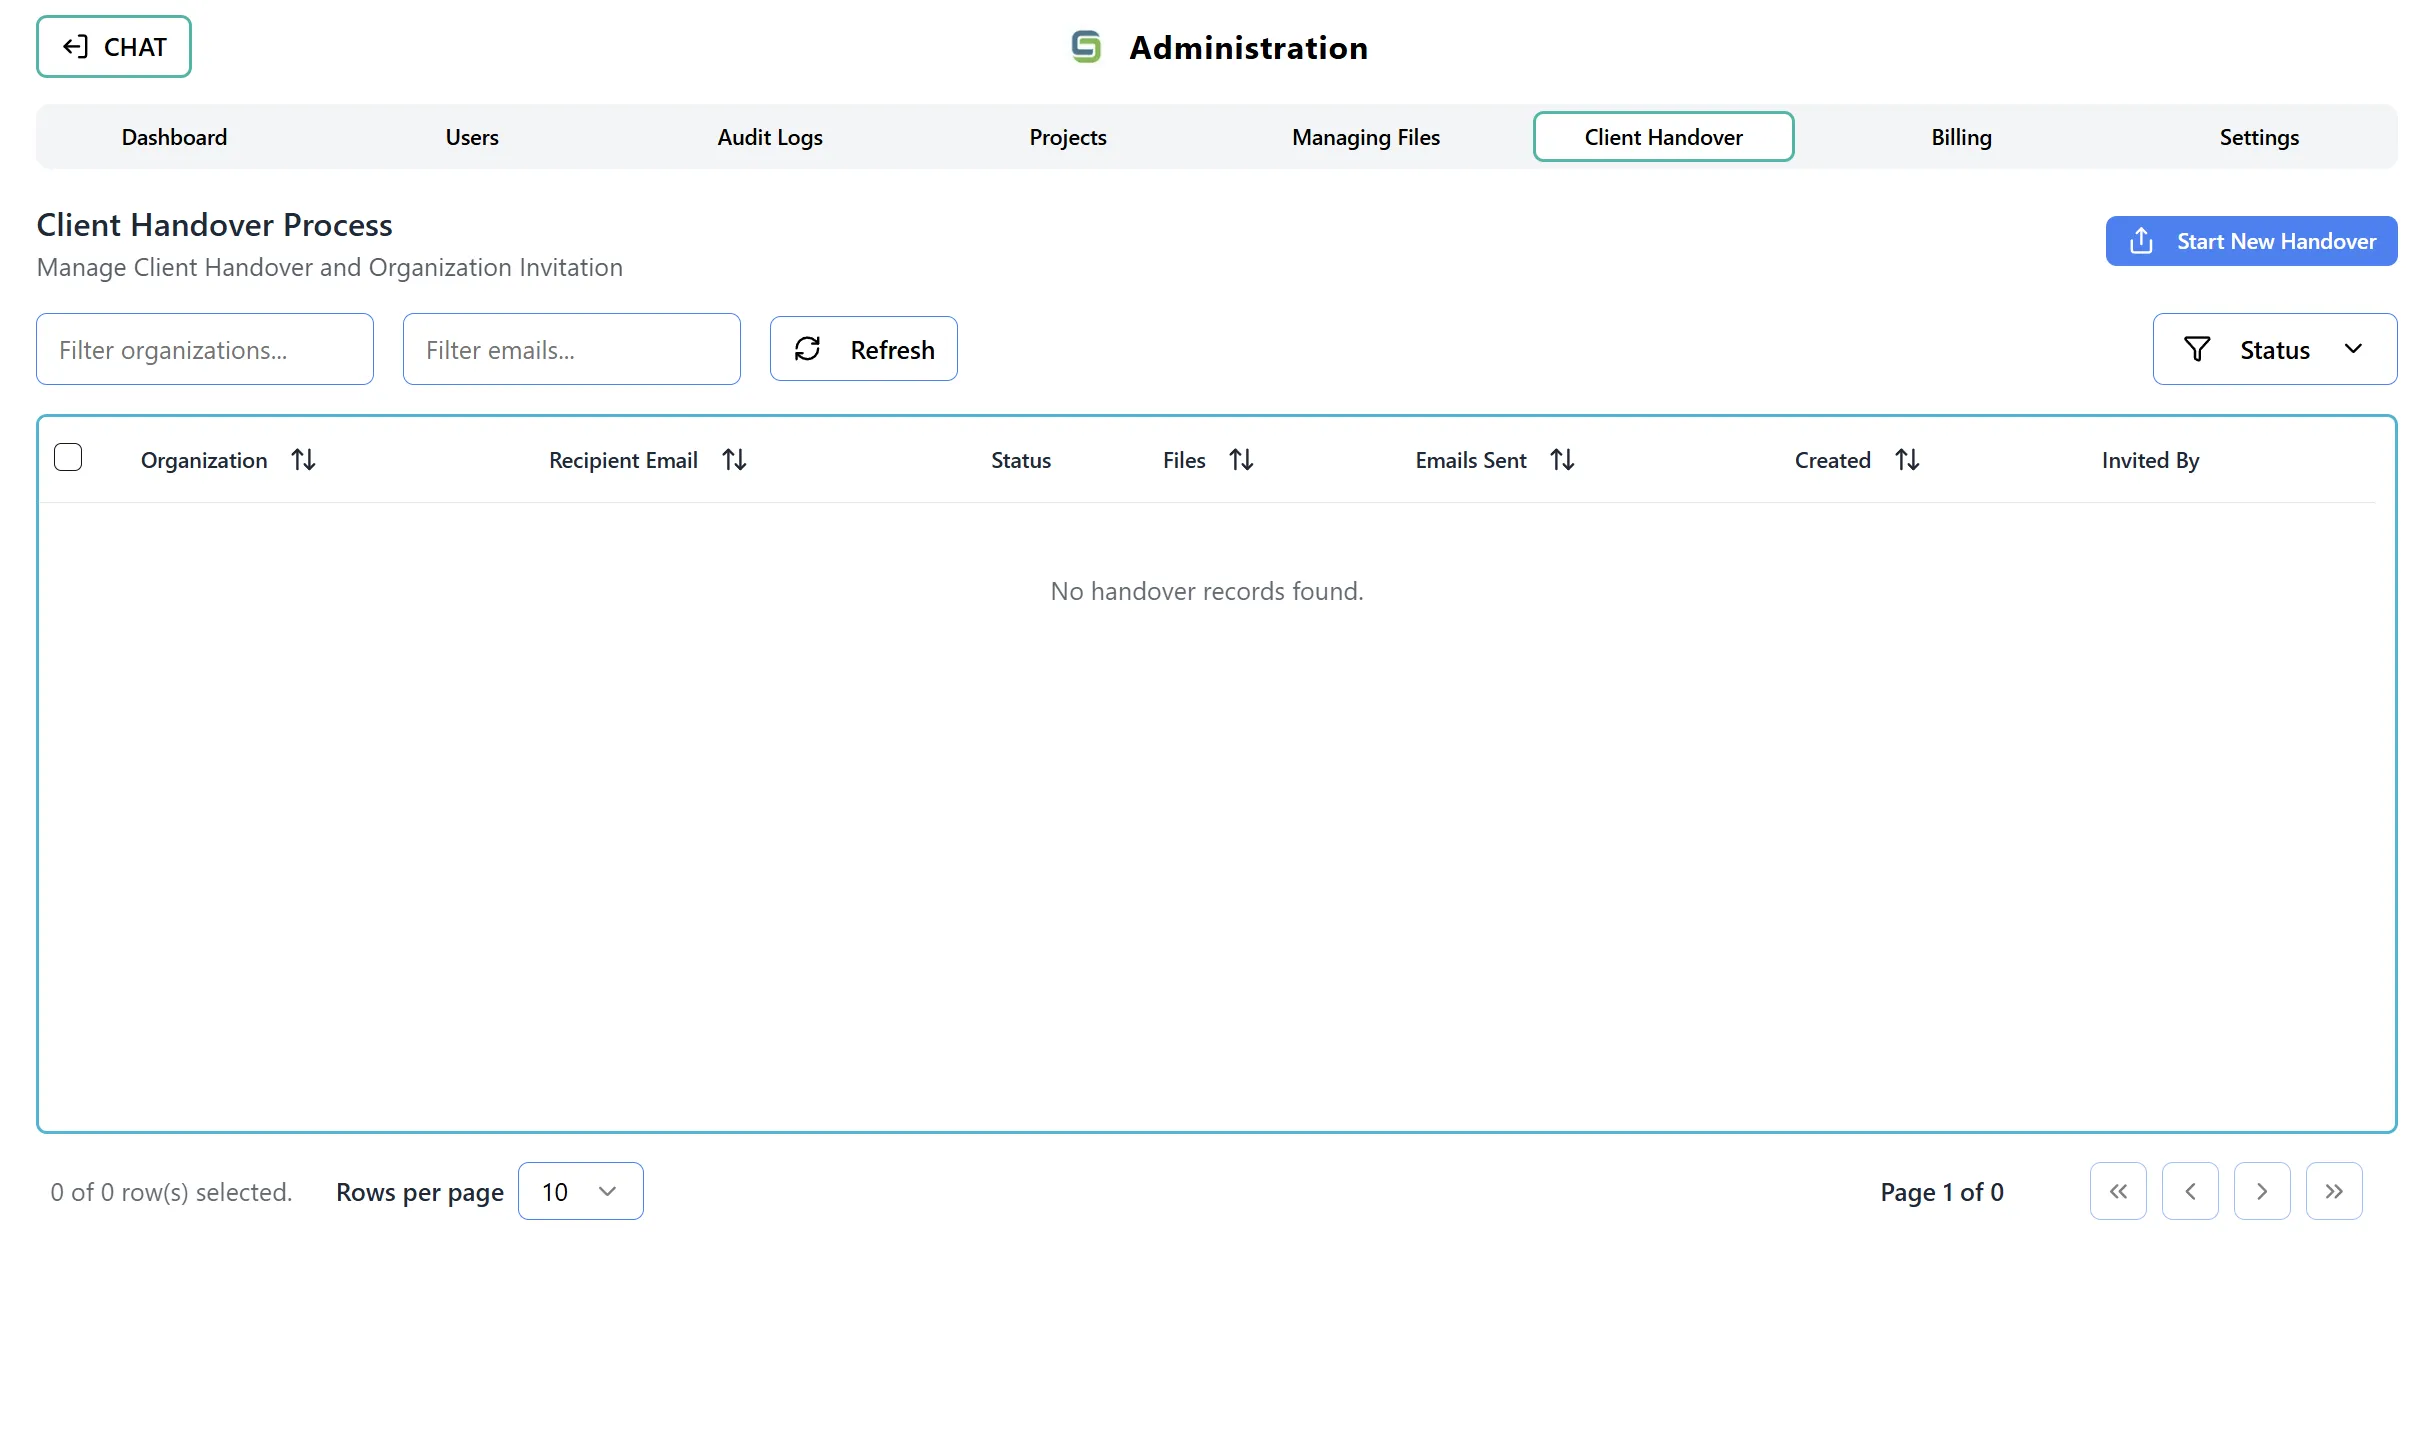
Step 1: Navigate to Handover Table View
Section titled “Step 1: Navigate to Handover Table View”When you first access the Handover Process page, you will see:
- Page Title: “Client Handover Process”
- Subtitle: “Manage Client Handover and Organization Invitation”
- A table displaying all existing handover records
- A “Start New Handover” button in the top-right corner
Step 2: Click “Start New Handover”
Section titled “Step 2: Click “Start New Handover””- Click the “Start New Handover” button (blue button with a Share icon)
- The interface will switch from the table view to the “Add New Handover” view
- All form fields will be cleared and ready for a new handover
Step 3: Understanding the Handover Interface
Section titled “Step 3: Understanding the Handover Interface”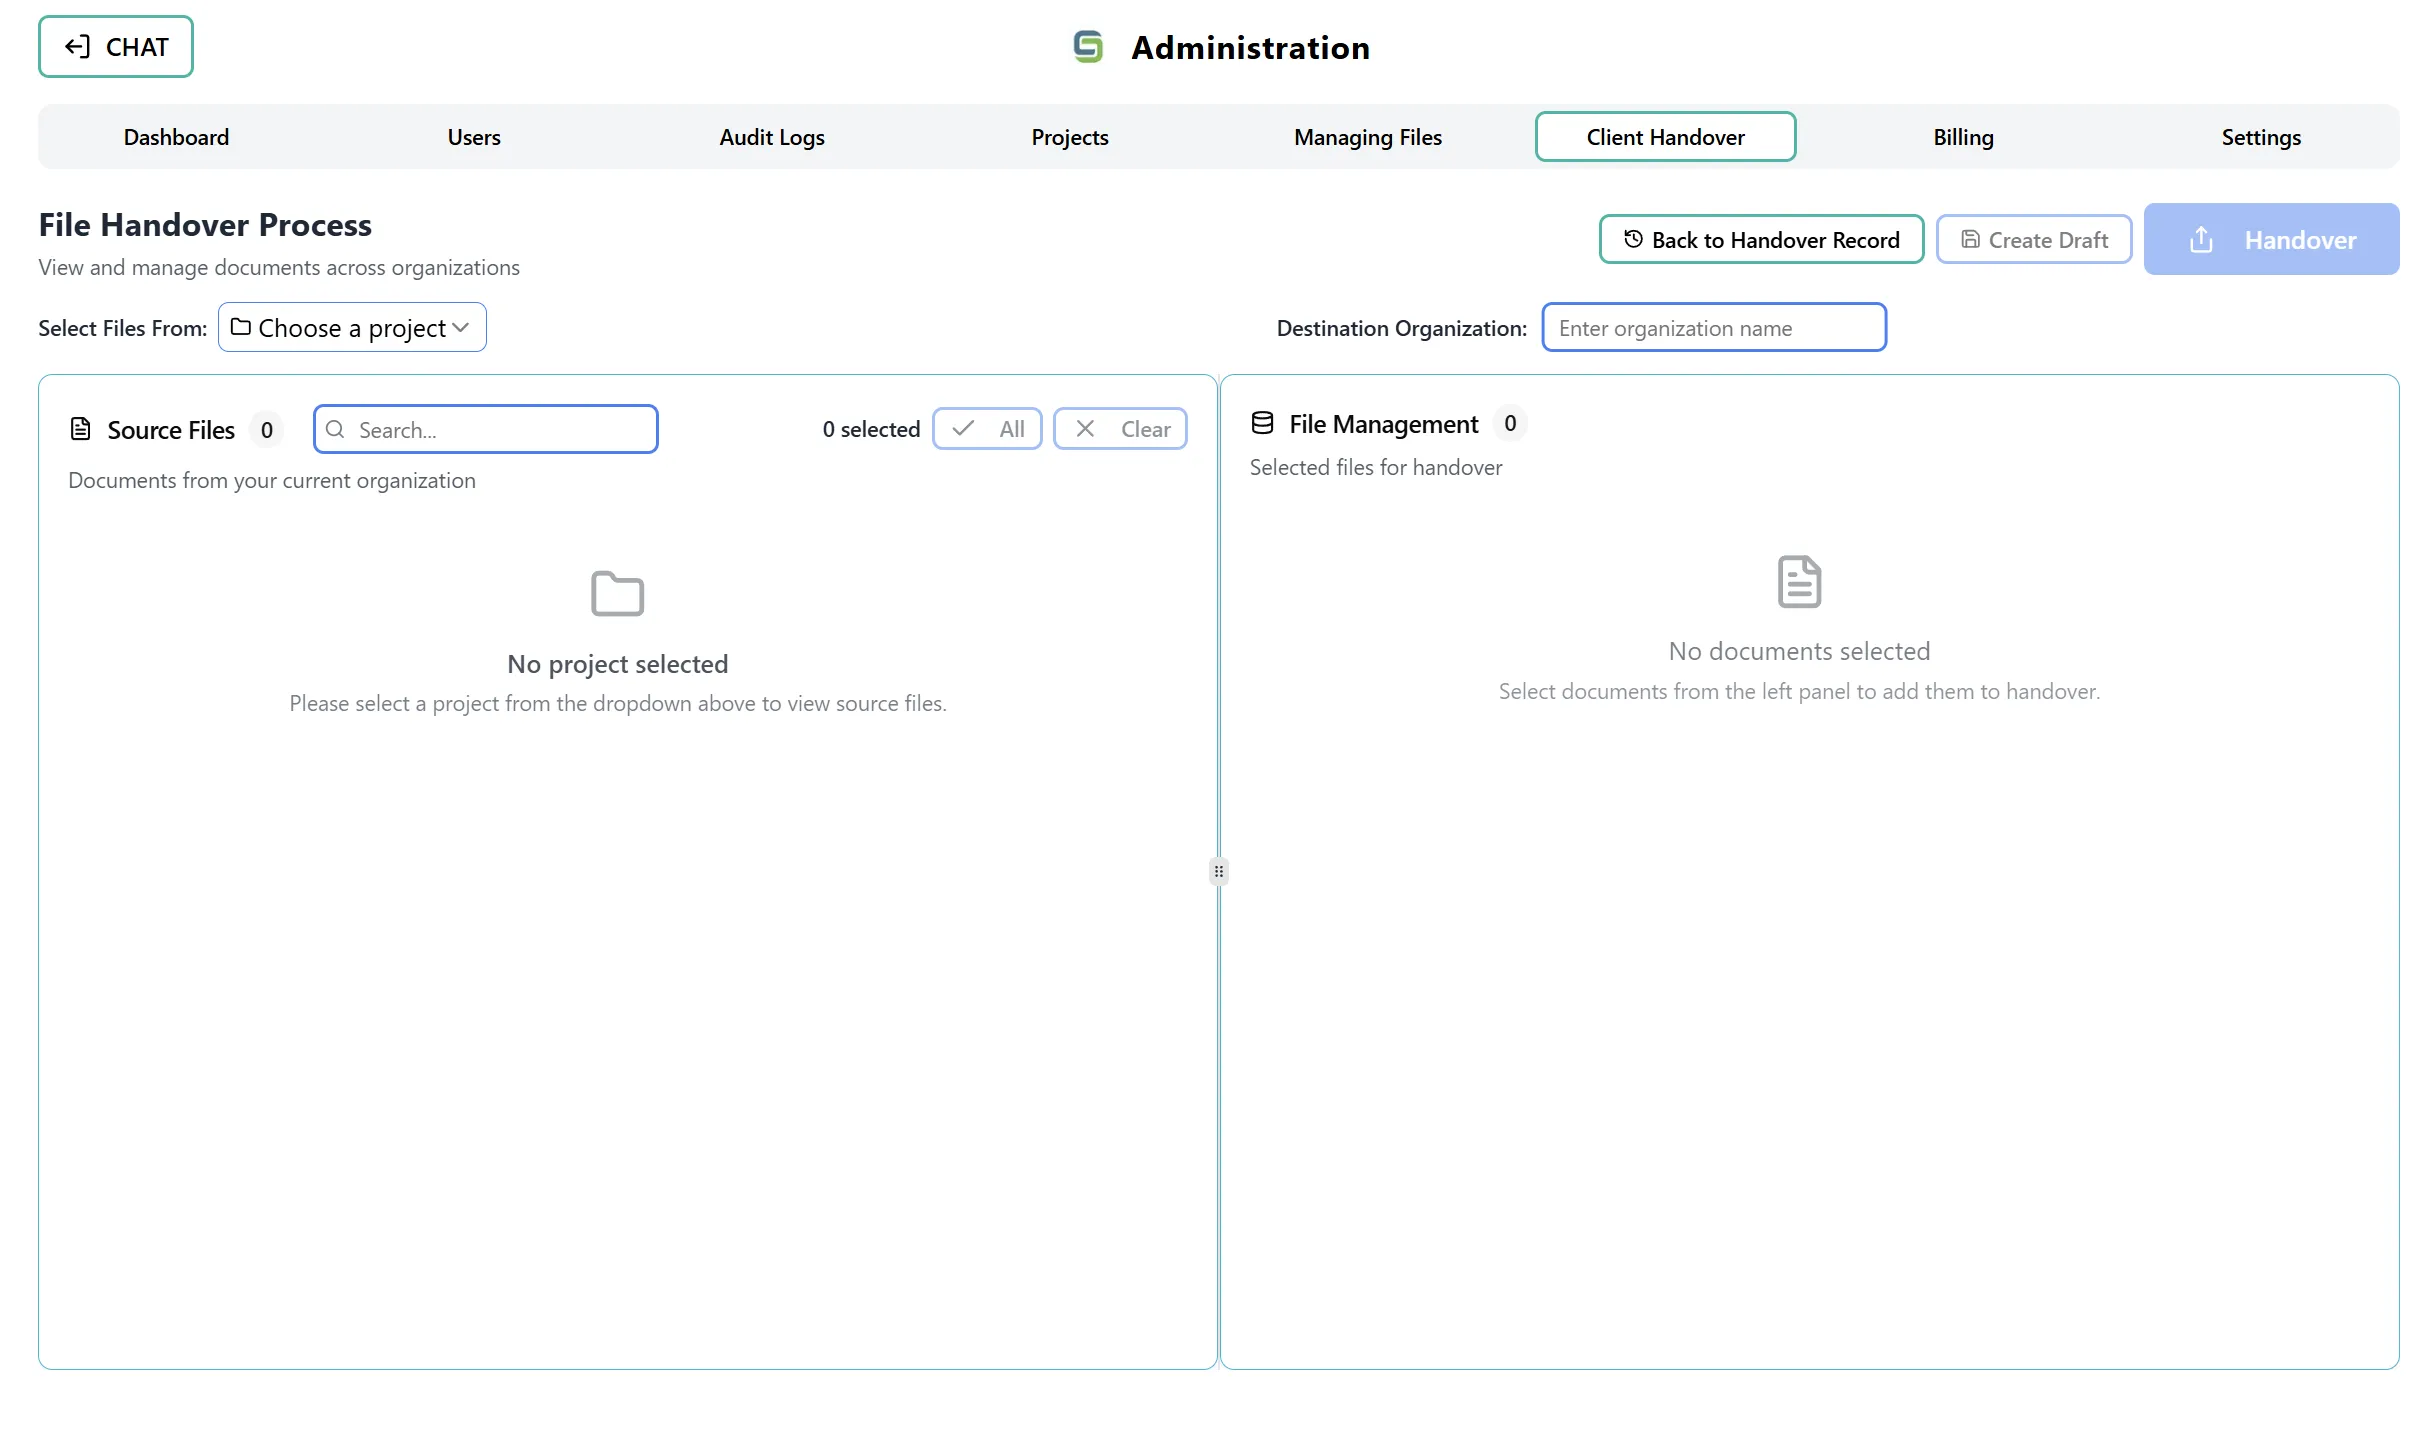
After clicking “Start New Handover”, you will see a two-panel layout:
Left Panel - Source Files:
- Displays all available documents from your current organization
- Shows documents organized in a tree structure (folders and files)
- Includes search functionality
- Shows selection counters and bulk action buttons
Right Panel - File Management:
- Displays documents you have selected for handover
- Shows the count of selected files
- Allows you to remove files from the selection
Selecting Documents
Section titled “Selecting Documents”Step 1: Select a Project
Section titled “Step 1: Select a Project”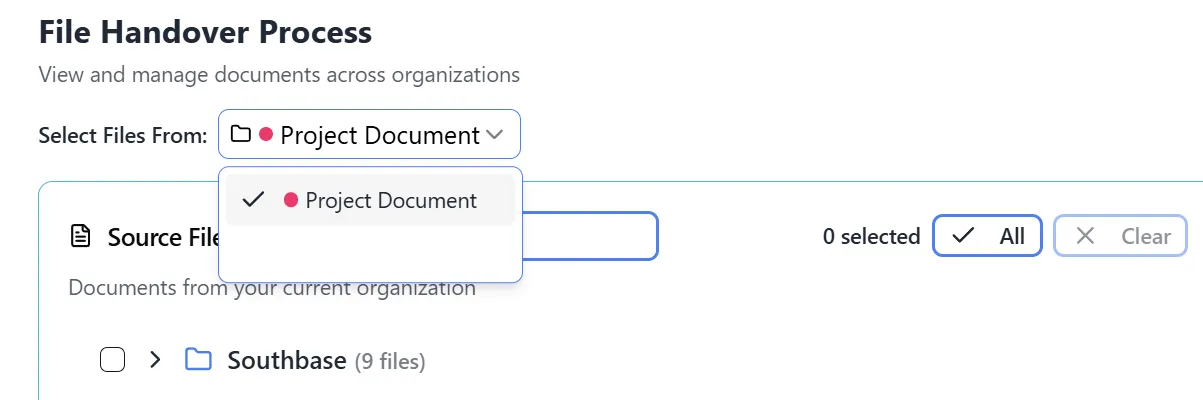 The “Select Files From” dropdown is shown open, displaying “Massey University” as a selectable project. Below this, the “Source Files” panel is visible, featuring a search bar and indicating “0” files currently selected, with a description “Documents from your current organization”.
- At the top of the Source Files panel, you will see a Project dropdown
- Select the project from which you want to transfer documents
- The tree view will update to show documents from the selected project
- If no project is selected, you will see a message: “No project selected”
Step 2: Browse the Document Tree
Section titled “Step 2: Browse the Document Tree”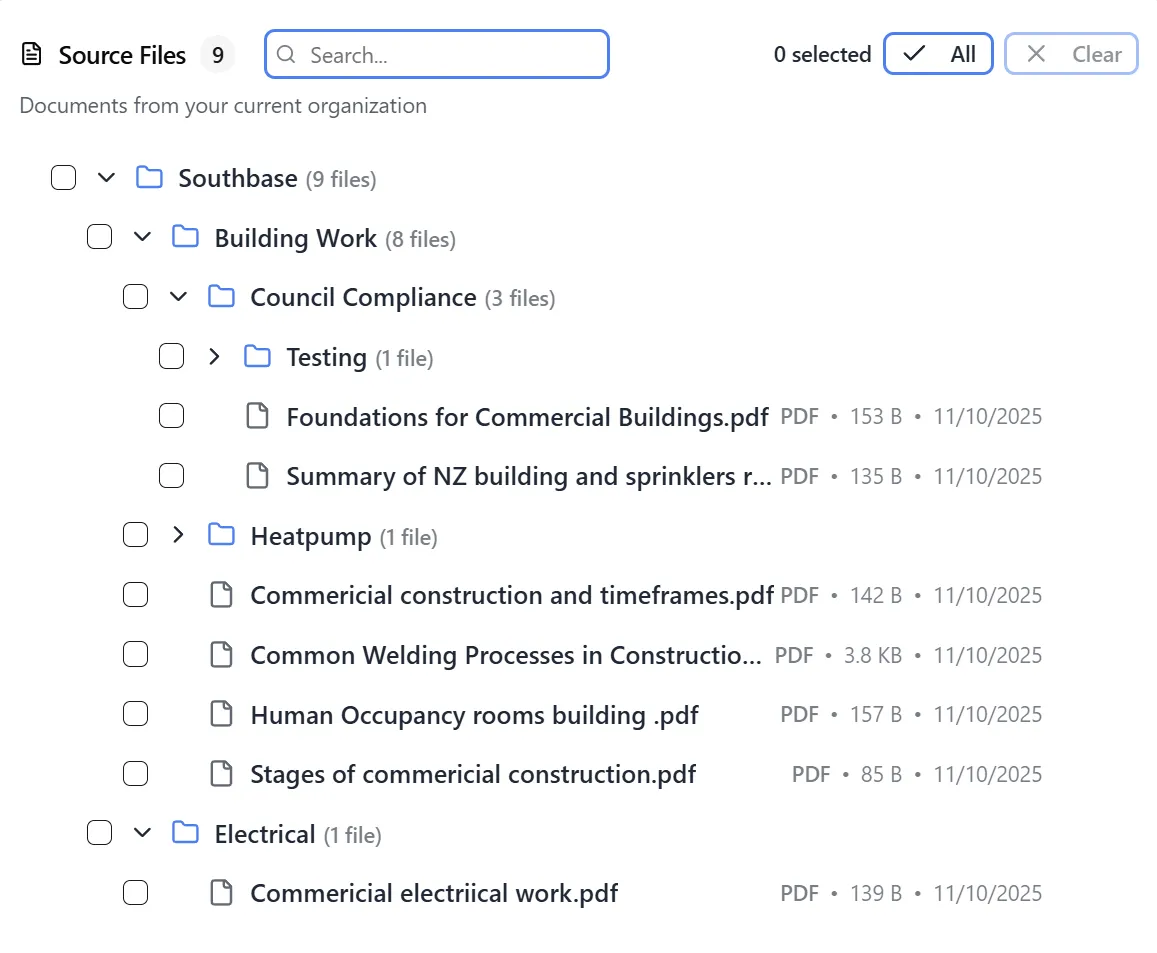 The document tree view shows a hierarchical structure with folders and files. Folders can be expanded or collapsed, and files are displayed with their file type icons. The tree maintains the original folder structure from the organization.
The Source Files panel displays documents in a hierarchical tree structure:
- Folders are shown with folder icons and can be expanded/collapsed
- Files are shown with file type icons
- Each item shows its name and may display file size and type information
- The tree maintains the original folder structure from your organization
Step 3: Search for Documents (Optional)
Section titled “Step 3: Search for Documents (Optional)”- Use the search box located next to the “Source Files” title
- Type keywords to filter documents
- The tree view will update in real-time to show matching files
- Clear the search to see all documents again
Step 4: Select Documents
Section titled “Step 4: Select Documents”You can select documents in several ways:
Individual Selection:
- Click the checkbox next to any file or folder
- Selecting a folder will select all files within that folder
- Selected items will be highlighted
Bulk Selection:
- Use the “All” button to select all visible documents
- Use the “Clear” button to deselect all documents
- The selection counter shows how many items are currently selected
Selection Counter:
- The header shows: “[X] selected” indicating the number of selected items
- This counter updates automatically as you select/deselect items
Step 5: Review Selected Files
Section titled “Step 5: Review Selected Files”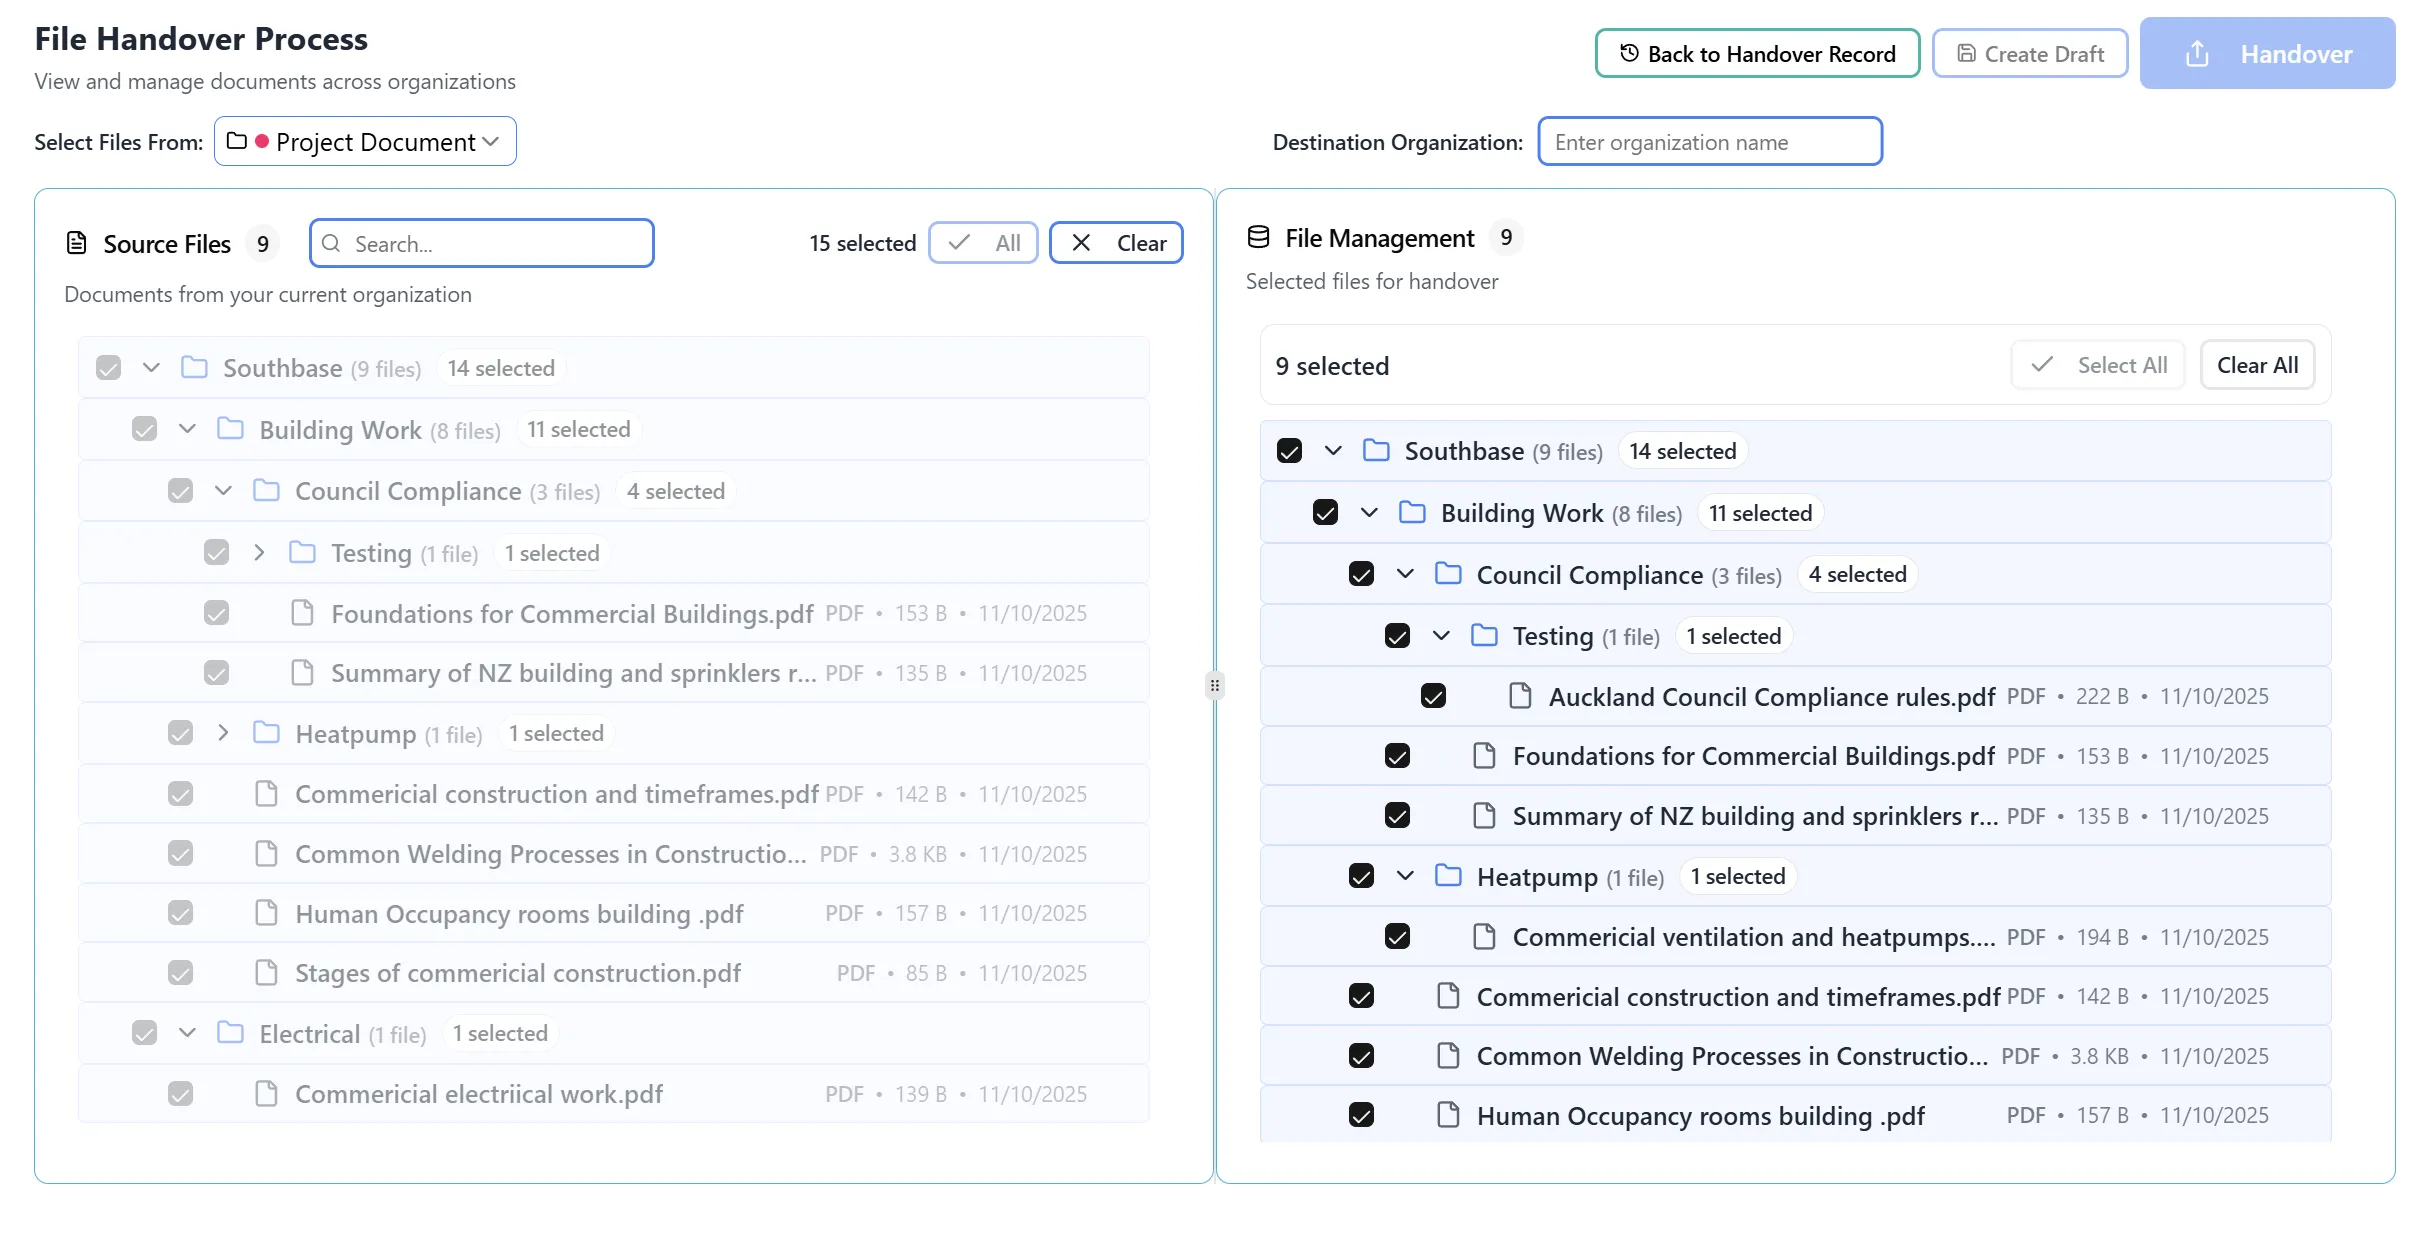
- Selected documents automatically appear in the right panel (File Management)
- The right panel shows:
- A count badge showing the number of selected files
- The same tree structure for easy review
- Ability to remove files by unchecking them
- You can preview any document by clicking on it (opens in a preview modal)
Step 6: Document Preview (Optional)
Section titled “Step 6: Document Preview (Optional)”- Click on any document in either panel to preview it
- A modal will open showing:
- Document title and metadata
- Full document content (if viewable)
- Document information (source, type, size, format, etc.)
- Tags and usage history
- Close the preview modal when finished reviewing
Step 7: Adjust Panel Sizes (Optional)
Section titled “Step 7: Adjust Panel Sizes (Optional)”- You can resize the two panels by dragging the divider between them
- This allows you to give more space to the panel you’re working with
- The panels have minimum and maximum size limits to maintain usability
Adding Organization Information and Saving Draft
Section titled “Adding Organization Information and Saving Draft”
Before you can proceed to review the selected files, you need to provide the destination organization information and save your progress.
Step 1: Enter Destination Organization Name
Section titled “Step 1: Enter Destination Organization Name”- Locate the “Destination Organization” input field at the top of the handover interface
- Enter the name of the organization that will receive the handover
- This will be the name of the new organization created for the recipient
- Example: “ABC Company” or “Client Organization”
- The organization name is required to proceed with the handover process
Step 2: Save as Draft
Section titled “Step 2: Save as Draft”- After entering the destination organization name, click the “Create Draft” button
- This button is located in the top-right area of the interface, typically next to other action buttons
- The button has a document icon
- Saving as draft will:
- Preserve your document selections
- Save the organization name you entered
- Allow you to return later to complete the handover
- Prevent loss of progress if you need to step away
- You will see a confirmation message indicating the draft has been saved successfully
- The draft can be accessed later from the handover table view
Note: You must save a draft before you can continue to the review and completion steps of the handover process.
Starting the Handover Process
Section titled “Starting the Handover Process”Once you have selected the files and added the organization name, you can start the handover process.
Step 1: Verify Your Selections
Section titled “Step 1: Verify Your Selections”Before proceeding, ensure you have:
- Selected the files you want to transfer (visible in the File Management panel)
- Entered the destination organization name in the “Destination Organization” field
- Saved a draft (optional but recommended) to preserve your progress
Step 2: Initiate the Handover
Section titled “Step 2: Initiate the Handover”- Locate the “Handover” button in the top-right area of the interface
- This button has a solid light blue background with white text
- It features an upward arrow icon
- It is positioned next to the “Create Draft” and “Back to Handover Record” buttons
- Click the “Handover” button to start the handover process
- The system will begin processing your handover request
Note: If you haven’t saved a draft yet, you may want to click “Create Draft” first to save your progress before clicking “Handover”. However, you can proceed directly with “Handover” if you’re ready to complete the process immediately.
Reviewing Selected Files
Section titled “Reviewing Selected Files”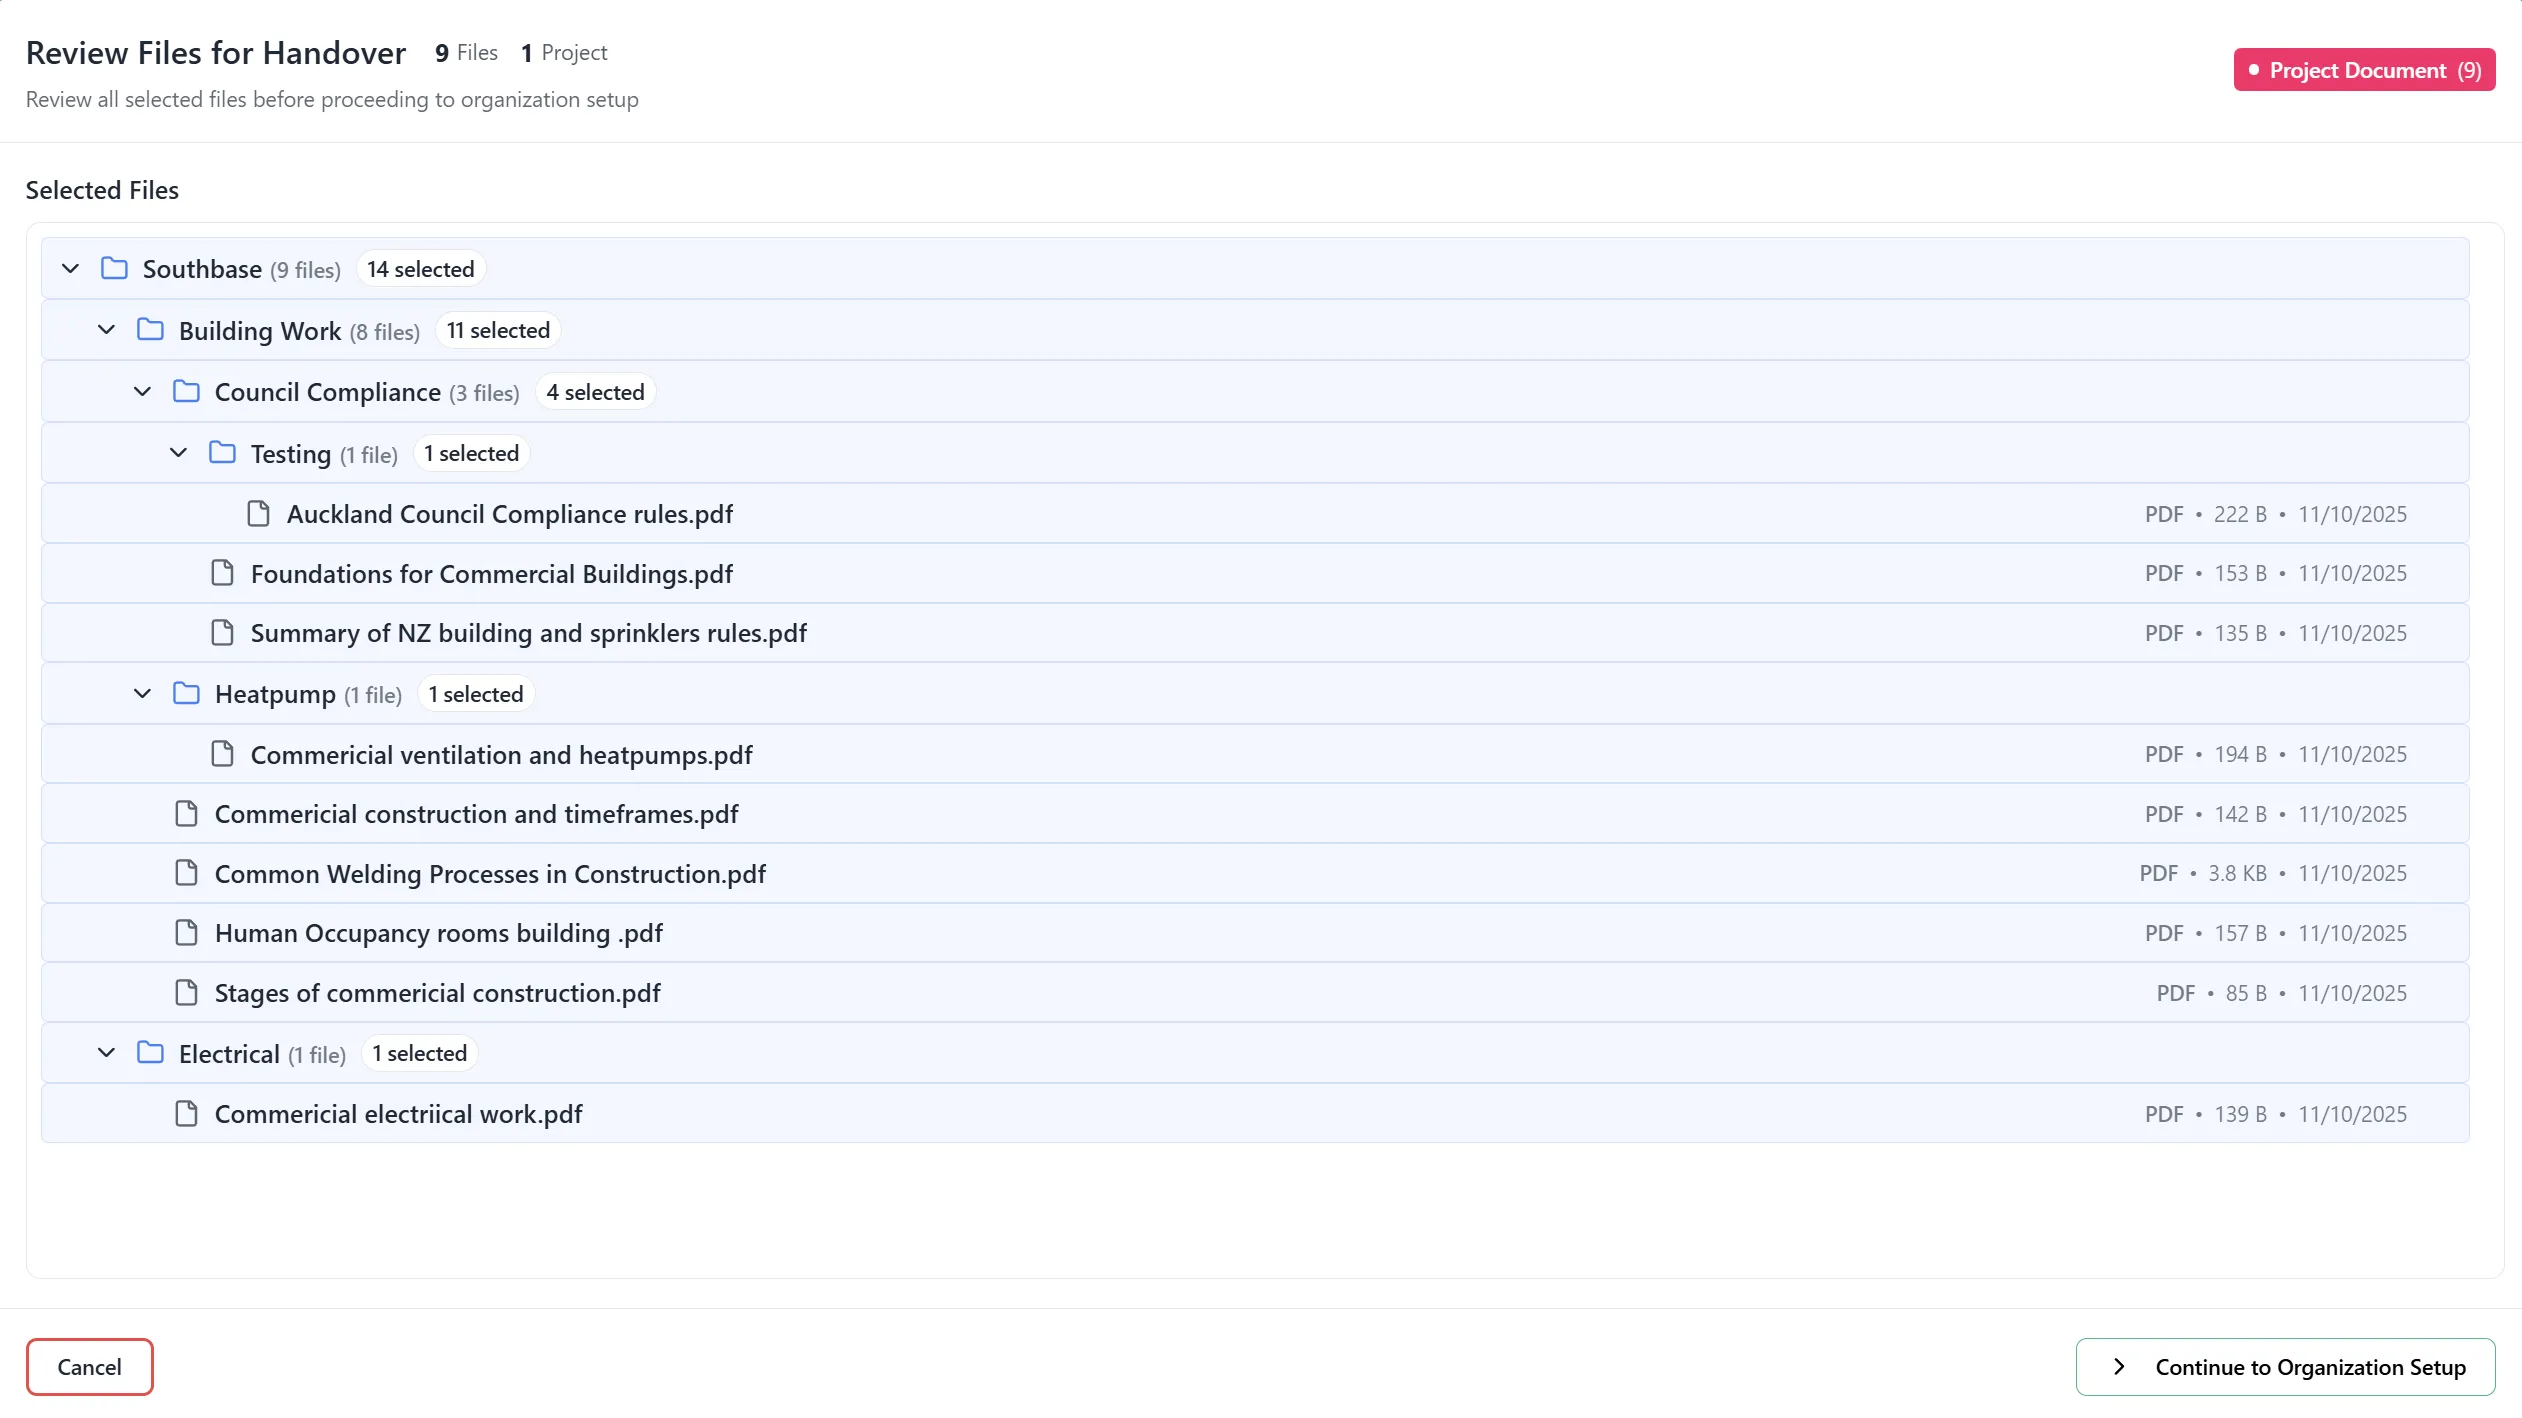
Step 1: Access Document Review
Section titled “Step 1: Access Document Review”Once you have selected the documents you want to transfer:
- Look for the “Review Files” or “Continue” button (typically at the bottom of the interface or in the File Management panel)
- Click this button to open the Document Review Modal
Step 2: Review Modal Overview
Section titled “Step 2: Review Modal Overview”The Review Modal displays:
-
Header Section:
- Title: “Review Files for Handover”
- Document count: Number of selected files
- Project count: Number of projects the files belong to
- Project badges: Color-coded badges showing which projects are included
-
Content Section:
- A scrollable list of all selected files in tree format
- Files organized by project and folder structure
- Ability to preview documents from this view
Step 3: Review Warnings
Section titled “Step 3: Review Warnings”The system may display warnings:
No Files Selected Warning:
- If you haven’t selected any files, a warning appears
- Explains that the recipient will receive organization access but no files
- You can still proceed, but consider if this is intentional
Multiple Projects Warning:
- If files from 2+ projects are selected, a warning appears
- Suggests selecting files from fewer projects for better organization
- This is informational; you can still proceed
Step 4: Final Review Actions
Section titled “Step 4: Final Review Actions”- Scroll through the list of selected files to verify your selection
- Preview documents by clicking on them if needed
- Cancel if you need to go back and adjust your selection
- Continue when you’re satisfied with the file selection
Step 5: Proceed to Organization Setup
Section titled “Step 5: Proceed to Organization Setup”- Click the “Continue to Organization Setup” button (green button with arrow)
- The Review Modal will close
- The Organization Setup Modal will open automatically
Setting Up Organization Information
Section titled “Setting Up Organization Information”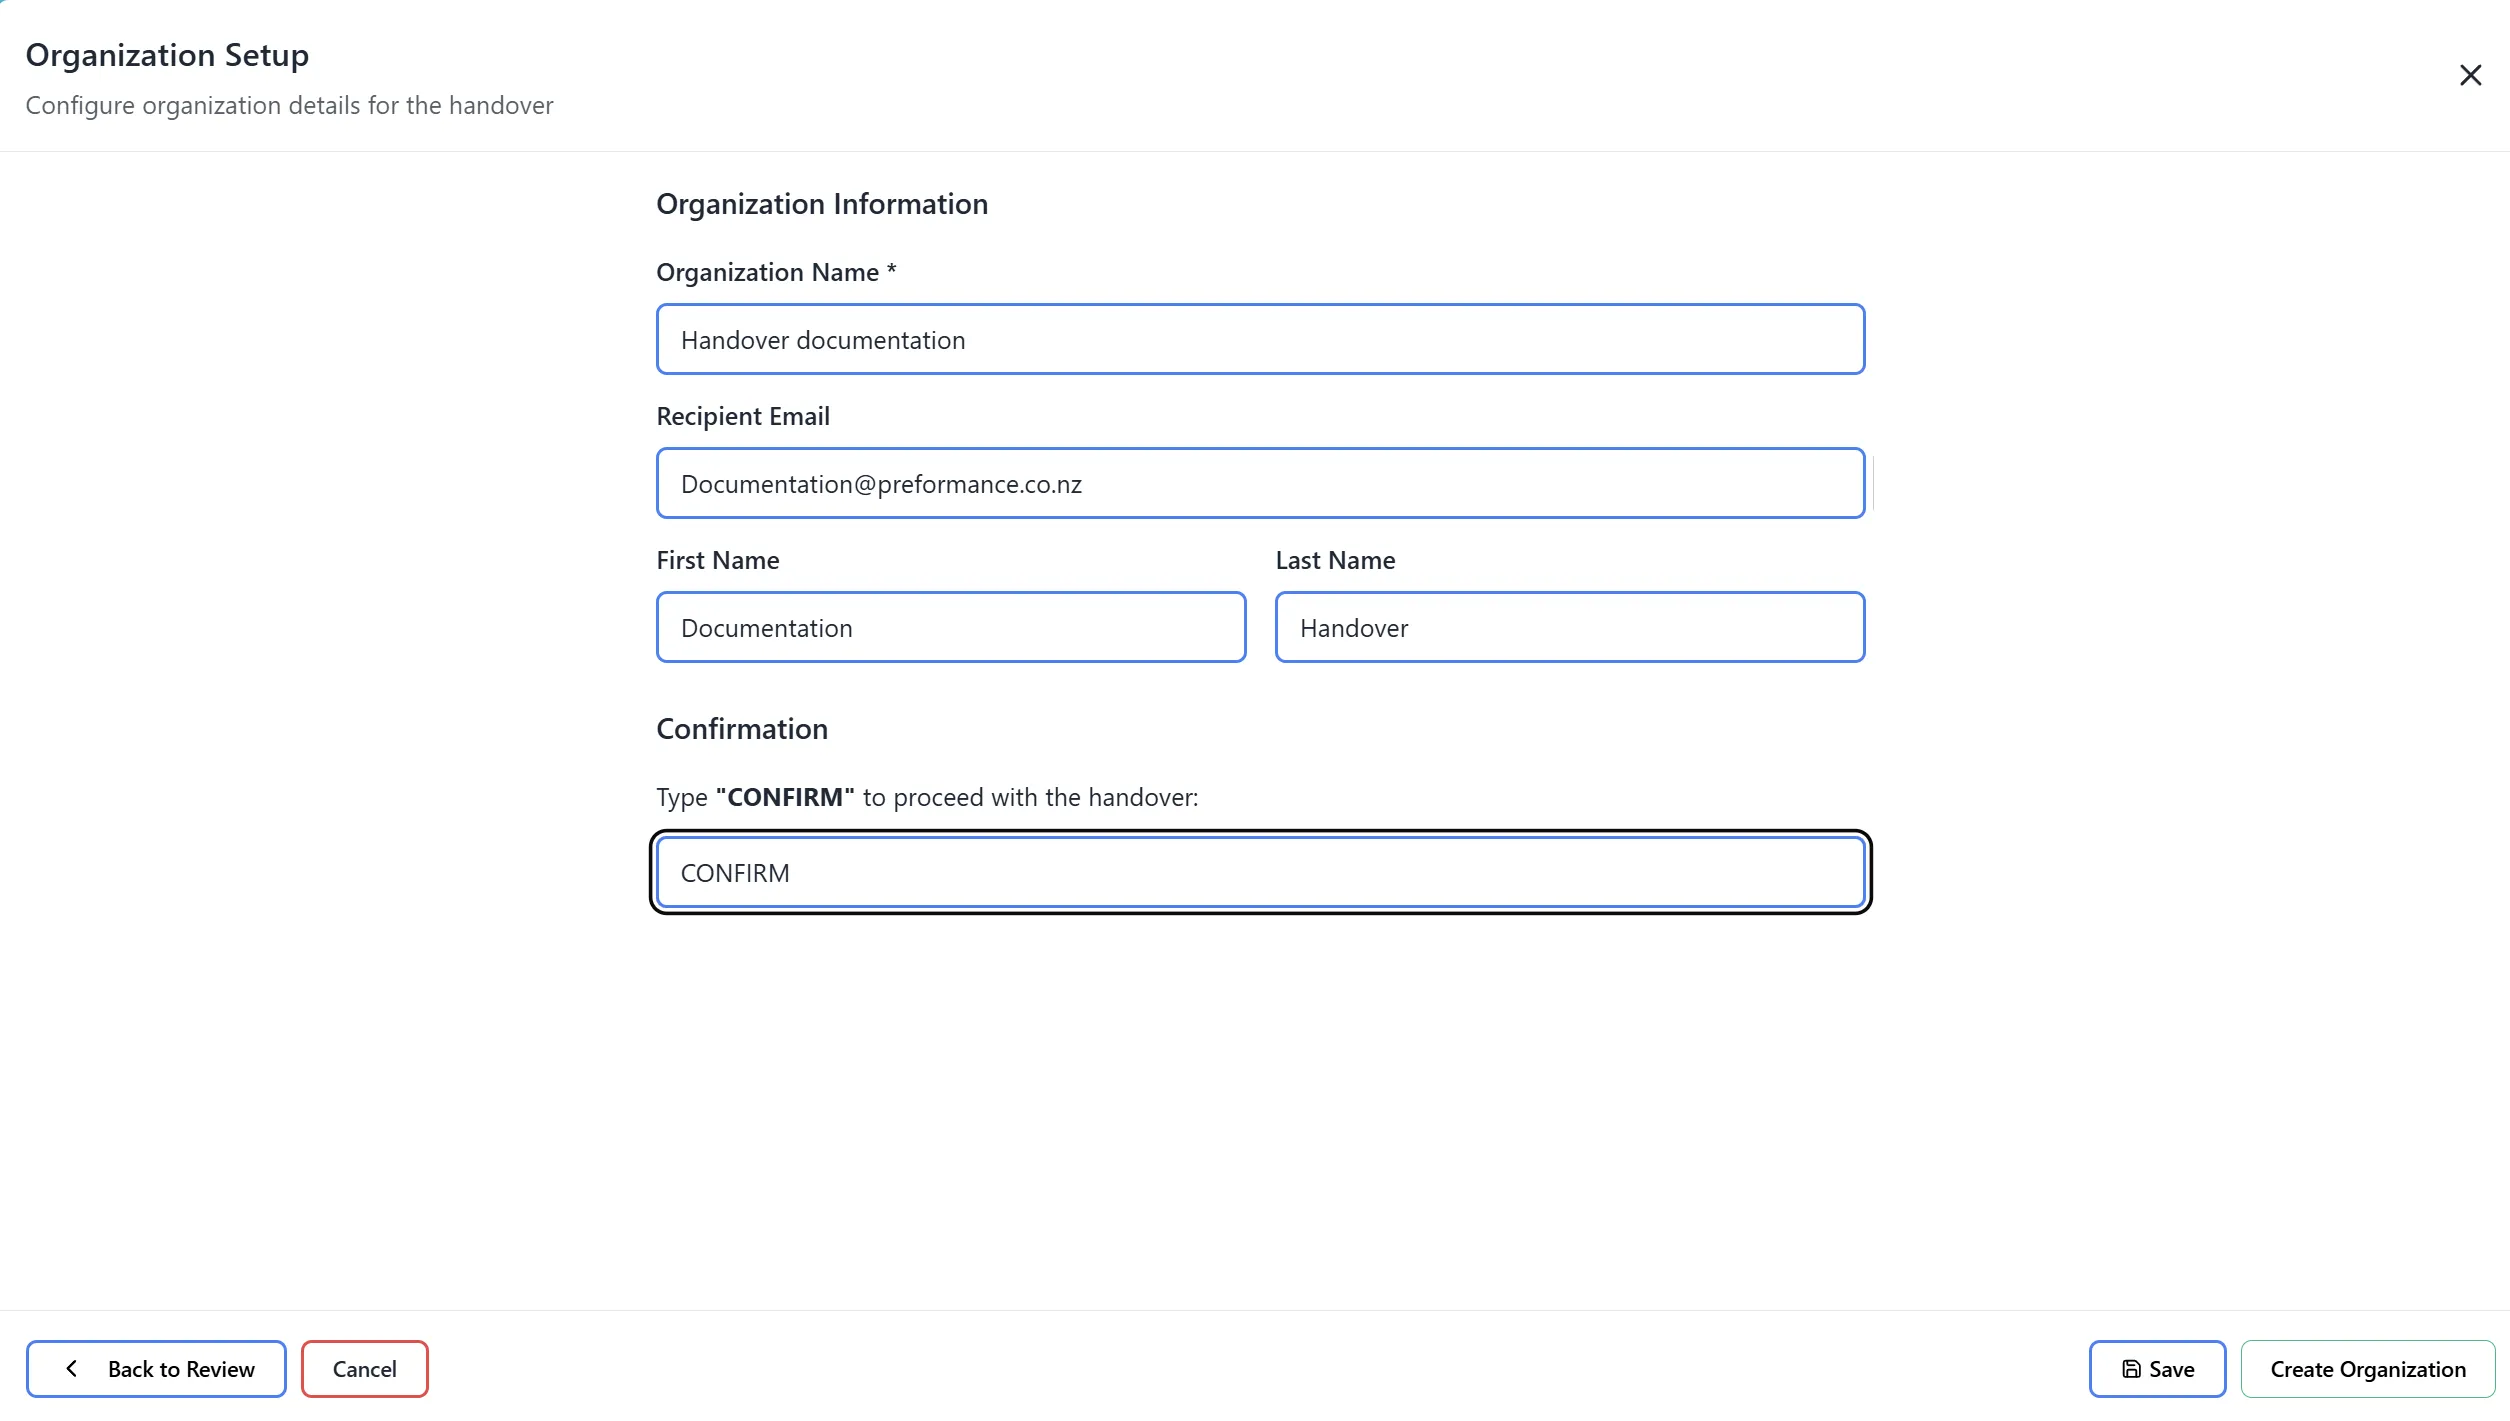
Step 1: Organization Setup Modal
Section titled “Step 1: Organization Setup Modal”After reviewing files, the Organization Setup Modal opens automatically. This modal contains:
Header:
- Title: “Organization Setup”
- Subtitle: “Configure organization details for the handover”
- Close button (X) in the top-right corner
Step 2: Fill in Organization Details
Section titled “Step 2: Fill in Organization Details”Organization Name (Required):
- Locate the “Organization Name” field (marked with *)
- Enter the name for the new organization that will be created
- This name will be used for the recipient’s organization
- Example: “ABC Company” or “Client Organization”
Recipient Email (Required):
- Locate the “Recipient Email” field
- Enter the email address of the person who will receive the handover
- This email will be used to send the invitation
- The email address is required to complete the handover
Recipient Name (Required):
- Fill in “First Name” field
- Fill in “Last Name” field
- These fields are required and help personalize the invitation email
Step 3: Confirmation Step
Section titled “Step 3: Confirmation Step”Type Confirmation:
- Scroll to the “Confirmation” section
- You will see instructions: “Type ‘CONFIRM’ to proceed with the handover”
- Type “CONFIRM” (all caps) in the confirmation field
- This is a safety measure to prevent accidental handovers
Step 4: Choose Handover Action
Section titled “Step 4: Choose Handover Action”At the bottom of the modal, you have two options:
Option A: Save as Draft
- Click “Save as Draft” button
- This saves your progress without sending the invitation
- You can return later to complete or edit the handover
- No email will be sent
- Useful for preparing handovers in advance
Option B: Create Organization
- Click “Create Organization” button (only enabled after typing “CONFIRM”)
- This will:
- Create the new organization for the recipient
- Send an invitation email to the recipient
- Display a success message confirming organization creation and email sent
- Show a “Continue to Confirm Document Handover” button for the next step
- Note: Document transfer happens separately after organization creation
Step 5: Cancel (If Needed)
Section titled “Step 5: Cancel (If Needed)”- Click “Cancel” to close the modal without saving
- Your document selections will be preserved, but organization details will not be saved
- You can return to this step later
Creating the Organization and Sending Invitation
Section titled “Creating the Organization and Sending Invitation”This is the first part of the handover process. It creates the new organization for the recipient and sends them an invitation email. Note: Document transfer happens separately in the next step.
Step 1: Final Confirmation
Section titled “Step 1: Final Confirmation”Before creating the organization:
- Verify all information is correct:
- Organization name is accurate
- Recipient email is correct and complete
- Recipient first name and last name are provided
- Document selection is complete
- Ensure you have typed “CONFIRM” in the confirmation field
Step 2: Create Organization
Section titled “Step 2: Create Organization”- Click the “Create Organization” button (only enabled after typing “CONFIRM”)
- The system will process your request:
- Creating the new organization for the recipient
- Generating an invitation token
- Sending invitation email to the recipient
- Note: Documents are NOT transferred at this stage
Step 3: Organization Creation Success
Section titled “Step 3: Organization Creation Success”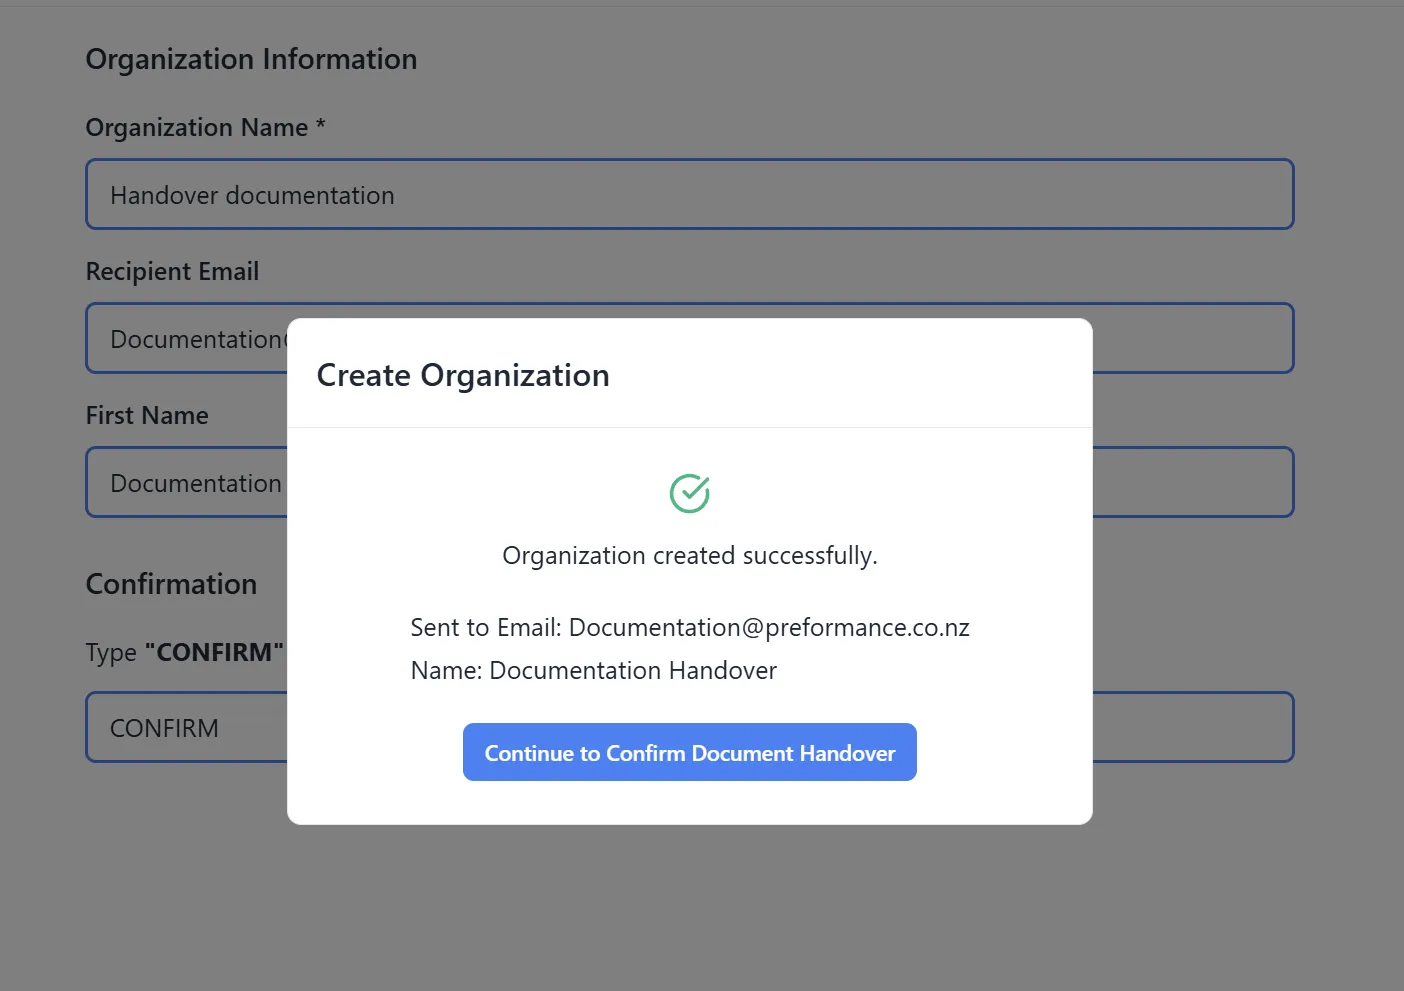
After clicking “Create Organization”, you will see:
-
Success Message:
- A confirmation message will appear indicating “Organization created successfully”
- This confirms that the new organization has been created for the recipient
-
Email Sent Confirmation:
- You will see details confirming that the invitation email has been sent
- Example: “Sent to Email: [recipient email]” and “Name: [recipient name]”
- The email contains the invitation link and instructions for accessing the new organization
- The recipient will receive an email with details on how to accept the invitation and access their new organization
-
Next Step Button:
- A “Continue to Confirm Document Handover” button will be available
- This button takes you to the separate document transfer process
Important: At this point, the organization has been created and the invitation email has been sent, but the documents have NOT been transferred yet. Document transfer is a separate process that happens next.
Confirming Document Handover
Section titled “Confirming Document Handover”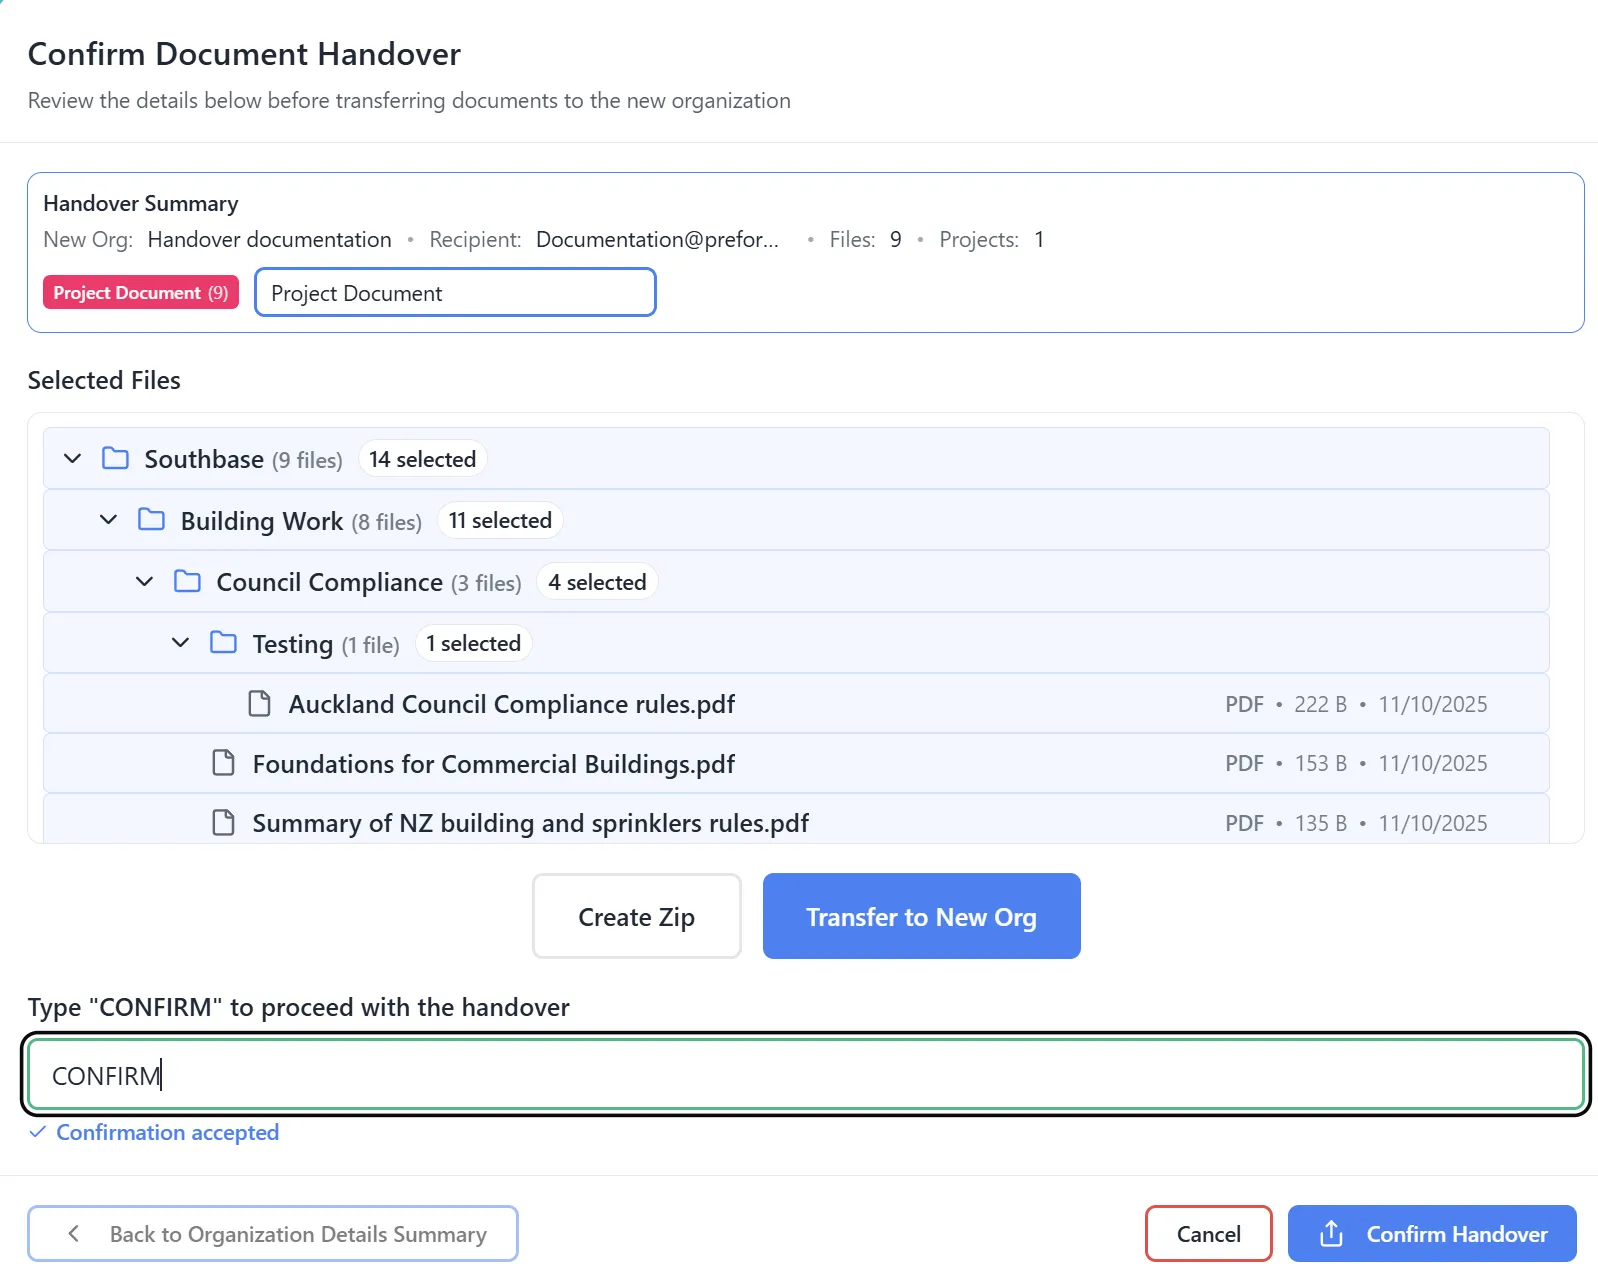
This is the second part of the handover process. After the organization has been created and the invitation email sent, you need to confirm the document transfer separately.
Step 1: Access Document Handover Confirmation
Section titled “Step 1: Access Document Handover Confirmation”- After seeing the organization creation success message, click the “Continue to Confirm Document Handover” button
- You will be taken to the document handover confirmation screen
- This screen will show:
- A summary of the selected documents
- The organization that will receive the documents
- Confirmation options for transferring the documents
Step 2: Review Document Transfer Details
Section titled “Step 2: Review Document Transfer Details”- Review the list of documents that will be transferred
- Verify the destination organization is correct
- Check the document count matches your expectations
Step 3: Confirm Document Transfer
Section titled “Step 3: Confirm Document Transfer”- Click the “Confirm Document Handover” button
- The system will process the document transfer:
- Transferring document access to the new organization
- Linking documents to the recipient’s organization
- Updating the handover record status
Step 4: Document Transfer Success
Section titled “Step 4: Document Transfer Success”Upon successful document transfer:
- A success message will appear confirming the documents have been transferred
- You may see:
- Confirmation that documents were transferred
- Number of documents transferred
- The handover record will be updated to show “pending” or “completed” status
- The modal will close automatically
- You will return to the handover table view
Step 5: Post-Handover Actions
Section titled “Step 5: Post-Handover Actions”After both processes are complete:
- The new handover will appear in the handover table with status “pending” or “completed”
- The recipient will have received:
- An invitation email to access their new organization
- Access to the transferred documents once they accept the invitation
- You can:
- View handover details by clicking on the row
- Resend the invitation email if needed
- Cancel the handover if necessary
- Monitor the handover status
Step 6: Handling Email Issues
Section titled “Step 6: Handling Email Issues”If email sending fails or is not configured:
- The system will provide an invitation URL that you can share manually
- Copy this URL and send it to the recipient through another method
- The invitation link will be valid for a specified period (typically 7 days)
Managing Draft Handovers
Section titled “Managing Draft Handovers”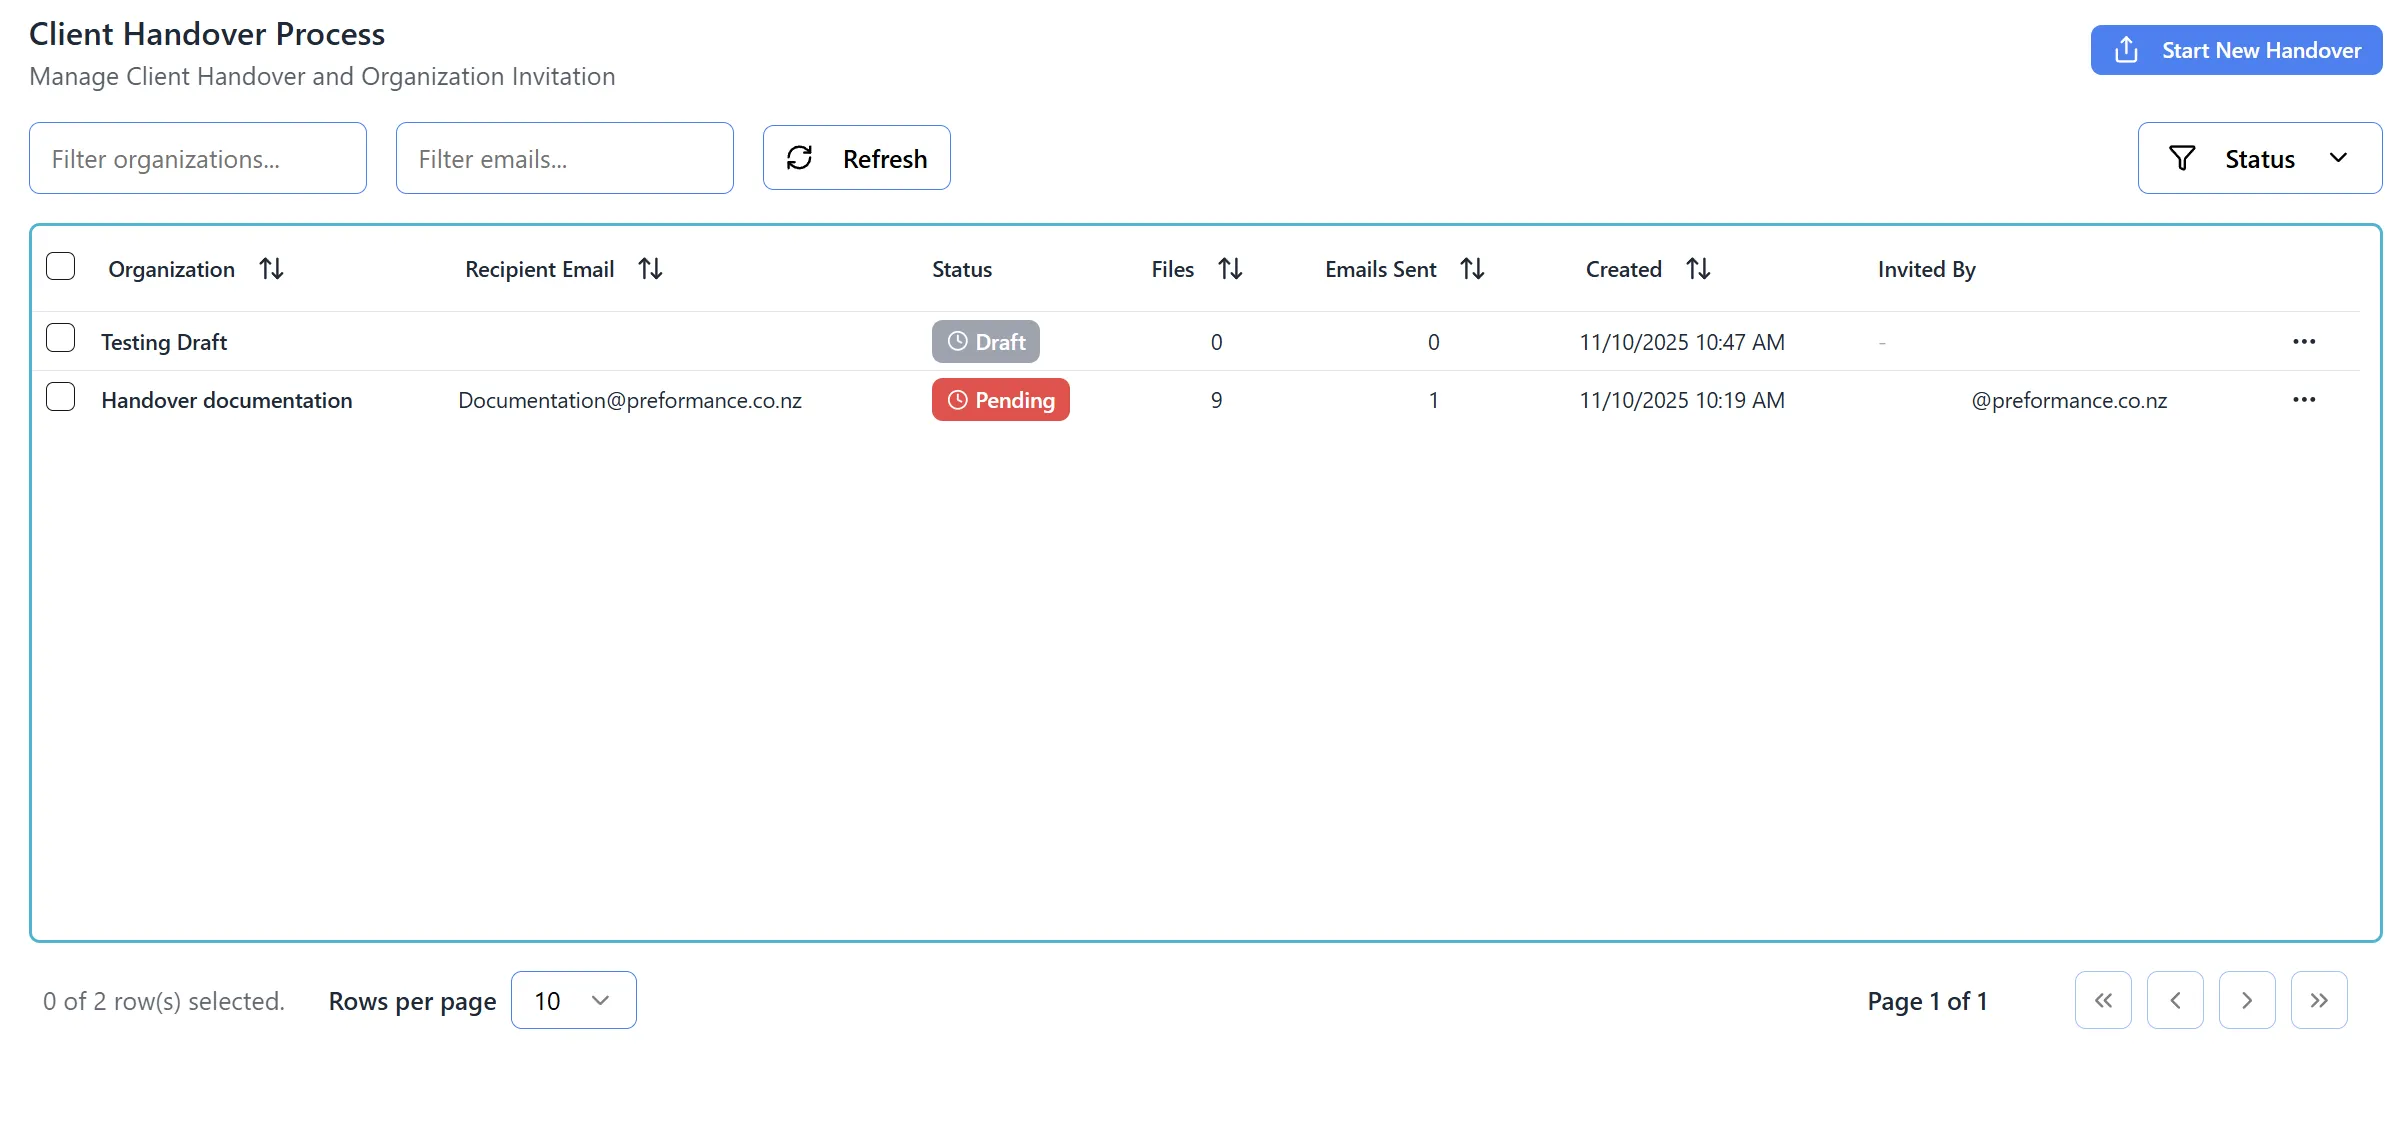 The Client Handover Process page displays a table with handover records. The table shows columns for Organization, Recipient Email, Status, Files, Emails Sent, Created, and Invited By. Example rows include a “Draft” status handover for “Testing Draft” with 0 files, and a “Pending” status handover for “Handover documentation” with 9 files. Filter options are available for organizations and emails, and a “Start New Handover” button is visible in the top-right corner.
Step 1: Identifying Drafts
Section titled “Step 1: Identifying Drafts”In the handover table:
- Draft handovers are marked with a “Draft” badge or status indicator
- They appear in the table alongside completed handovers
- The draft count is shown on the dashboard card
Step 2: Opening a Draft
Section titled “Step 2: Opening a Draft”- Find the draft handover in the table
- Click on the row to view details
- You will see a “Continue Editing” button if it’s a draft
Step 3: Editing a Draft
Section titled “Step 3: Editing a Draft”- Click “Continue Editing” button
- You will return to the “Add New Handover” view with:
- Previously selected documents loaded
- Previously entered organization information loaded
- All your previous work preserved
Step 4: Modifying Draft Content
Section titled “Step 4: Modifying Draft Content”You can:
- Change document selection: Add or remove files
- Update organization name: Modify the organization name
- Update recipient information: Change email, first name, or last name
- Save as draft again: Click “Save as Draft” to update the draft
- Complete the handover: Click “Complete Handover” when ready
Step 5: Deleting a Draft
Section titled “Step 5: Deleting a Draft”- Open the draft handover details
- Look for a “Delete” or “Remove” option (typically in a dropdown menu)
- Confirm the deletion
- The draft will be removed from the system
Viewing Handover History
Section titled “Viewing Handover History”Step 1: Access Handover Table
Section titled “Step 1: Access Handover Table”The handover table shows all handovers with the following information:
- Status: pending, completed, expired, cancelled, or draft
- Recipient Email: Email address of the recipient
- Organization Name: Name of the created organization
- Document Count: Number of documents transferred
- Date Created: When the handover was initiated
- Last Updated: When the handover was last modified
Step 2: Filter and Sort
Section titled “Step 2: Filter and Sort”You can typically:
- Sort by different columns (date, status, etc.)
- Filter by status (if filter options are available)
- Search for specific handovers (if search functionality exists)
Step 3: View Handover Details
Section titled “Step 3: View Handover Details”- Click on any handover row in the table
- The view will switch to show detailed information about that handover
- You can see:
- Full recipient information
- List of transferred documents
- Handover status and timeline
- Actions available for that handover
Step 4: Handover Actions
Section titled “Step 4: Handover Actions”Depending on the handover status, you may see different action buttons:
For Pending Handovers:
- Resend Email: Resend the invitation email
- Cancel: Cancel the handover
- View Details: See full handover information
For Completed Handovers:
- View Details: See full handover information (read-only)
- No editing options available
For Draft Handovers:
- Continue Editing: Resume editing the draft
- Delete: Remove the draft
- Complete: Finish and send the handover
For Expired Handovers:
- Resend: Resend the invitation with a new expiration date
- Cancel: Cancel the handover
Step 5: Return to Table View
Section titled “Step 5: Return to Table View”- Click the “Back to Table” button when viewing handover details
- You will return to the main handover table view
- The table will refresh to show the latest status
Key Features Summary
Section titled “Key Features Summary”Document Selection Features
Section titled “Document Selection Features”- Tree View: Hierarchical display of folders and files
- Search: Real-time search to find specific documents
- Bulk Selection: Select all or clear all with one click
- Multi-Project Support: Select files from multiple projects
- Document Preview: View documents before selecting
- Selection Counter: See how many files are selected
Organization Setup Features
Section titled “Organization Setup Features”- Organization Creation: Automatically creates new organization
- Recipient Management: Enter recipient details
- Draft Support: Save progress and complete later
- Confirmation Step: Type “CONFIRM” to prevent accidents
- Email Integration: Automatic invitation emails
Handover Management Features
Section titled “Handover Management Features”- Status Tracking: Monitor handover progress
- Draft Management: Edit and complete saved drafts
- Email Resend: Resend invitations if needed
- Cancellation: Cancel handovers if necessary
- History View: See all past handovers
Best Practices
Section titled “Best Practices”Before Starting a Handover
Section titled “Before Starting a Handover”- Verify Document Selection: Ensure you’ve selected all necessary files
- Check Recipient Information: Confirm email addresses and names are correct
- Review Organization Name: Choose a clear, descriptive organization name
- Consider Project Organization: Try to select files from fewer projects when possible
During Handover Creation
Section titled “During Handover Creation”- Use Drafts for Complex Handovers: Save as draft if you need to gather more information
- Preview Documents: Use the preview feature to verify file contents
- Double-Check Confirmation: Ensure you’ve typed “CONFIRM” correctly
- Save Progress: Don’t hesitate to save as draft if interrupted
After Handover Completion
Section titled “After Handover Completion”- Monitor Status: Check the handover status regularly
- Follow Up: Contact recipient if they haven’t accepted within a few days
- Resend if Needed: Use the resend feature if the email wasn’t received
- Document the Handover: Keep records of what was transferred
Troubleshooting
Section titled “Troubleshooting”Issue: Can’t See Documents in Source Files Panel
Section titled “Issue: Can’t See Documents in Source Files Panel”Solutions:
- Ensure a project is selected from the dropdown
- Check that the project has documents uploaded
- Try refreshing the page
- Verify you have access to the organization’s documents
Issue: Documents Not Appearing in File Management Panel
Section titled “Issue: Documents Not Appearing in File Management Panel”Solutions:
- Ensure you’ve checked the boxes next to documents
- Check that documents are from the selected project
- Try deselecting and reselecting documents
- Refresh the page if the interface seems stuck
Issue: Can’t Complete Handover
Section titled “Issue: Can’t Complete Handover”Solutions:
- Verify you’ve typed “CONFIRM” exactly (all caps)
- Check that organization name is filled in
- Ensure at least some information is entered
- Try saving as draft first, then completing
Issue: Email Not Received by Recipient
Section titled “Issue: Email Not Received by Recipient”Solutions:
- Check spam/junk folders
- Verify the email address is correct
- Use the “Resend Email” feature
- Manually share the invitation URL if provided
- Check email server configuration with your administrator
Issue: Can’t Find Draft Handover
Section titled “Issue: Can’t Find Draft Handover”Solutions:
- Look for drafts in the handover table
- Check the draft count on the dashboard
- Ensure you’re viewing the correct organization
- Try refreshing the page
Security Notes
Section titled “Security Notes”- Only users with admin privileges can access the handover feature
- Handovers create new organizations with secure access controls
- Invitation tokens expire after a set period (typically 7 days)
- Confirmation step prevents accidental handovers
- All handover actions are logged for audit purposes