Organization Settings
This procedure guide explains how to use the Organization Settings tab (also labeled as “Settings”) to manage your organization’s basic information and branding. The Settings tab allows administrators to update the organization name and upload or manage the organization logo.
Table of Contents
Section titled “Table of Contents”- Accessing the Settings Tab
- Understanding the Settings Interface
- Viewing Current Organization Information
- Updating Organization Name
- Uploading Organization Logo
- Changing Organization Logo
- Removing Organization Logo
- Saving Changes
- Canceling Changes
Accessing the Settings Tab
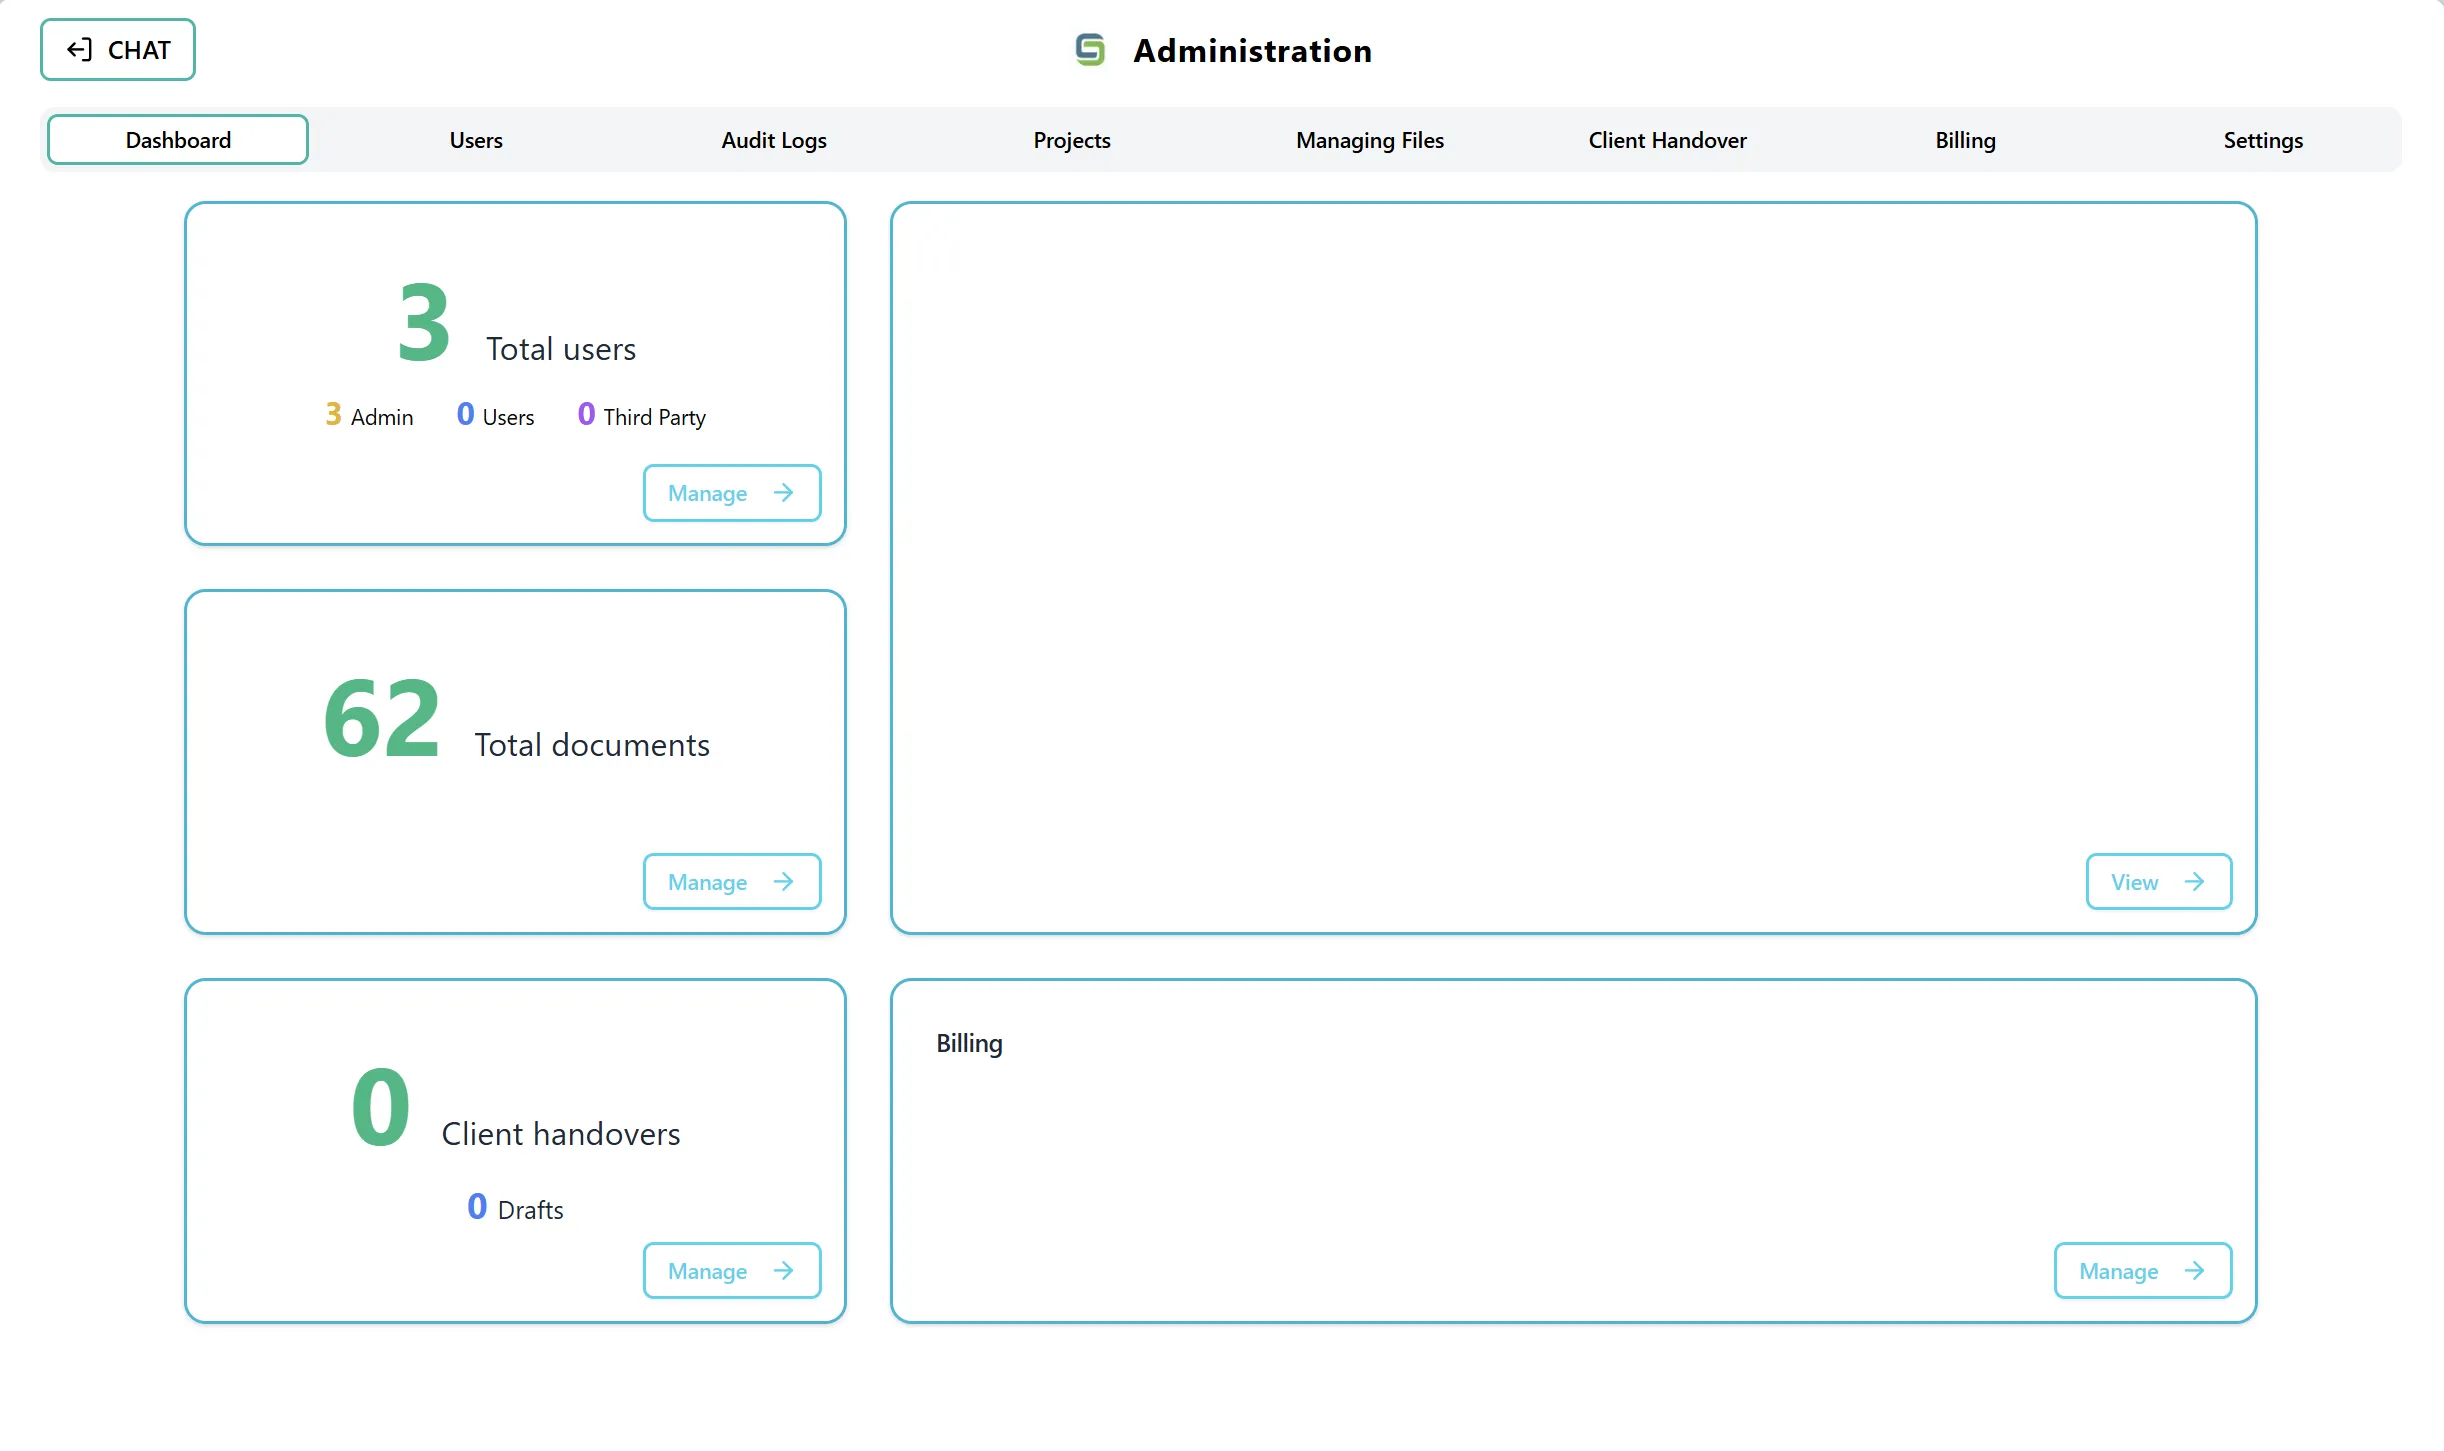
Section titled “Accessing the Settings Tab”Step 1: Navigate to Admin Dashboard
Section titled “Step 1: Navigate to Admin Dashboard”- Log in to the application with admin privileges
- Navigate to the Admin Dashboard (typically accessible from the main navigation menu)
- The dashboard displays several cards showing statistics and quick access to different admin features
Step 2: Access the Settings Tab
Section titled “Step 2: Access the Settings Tab”You can access the Settings tab in two ways:
Option A: Using the Navigation Tab
- In the Admin section, locate the top navigation tabs
- Click on the “Settings” tab
- The Settings tab is located alongside other admin sections such as Dashboard, Users, Audit Logs, Projects, Managing Files, Client Handover, and Billing
Option B: Direct Navigation
- From any admin section, click on the “Settings” tab in the top navigation
- The Organization Settings interface will load
Understanding the Settings Interface
Section titled “Understanding the Settings Interface”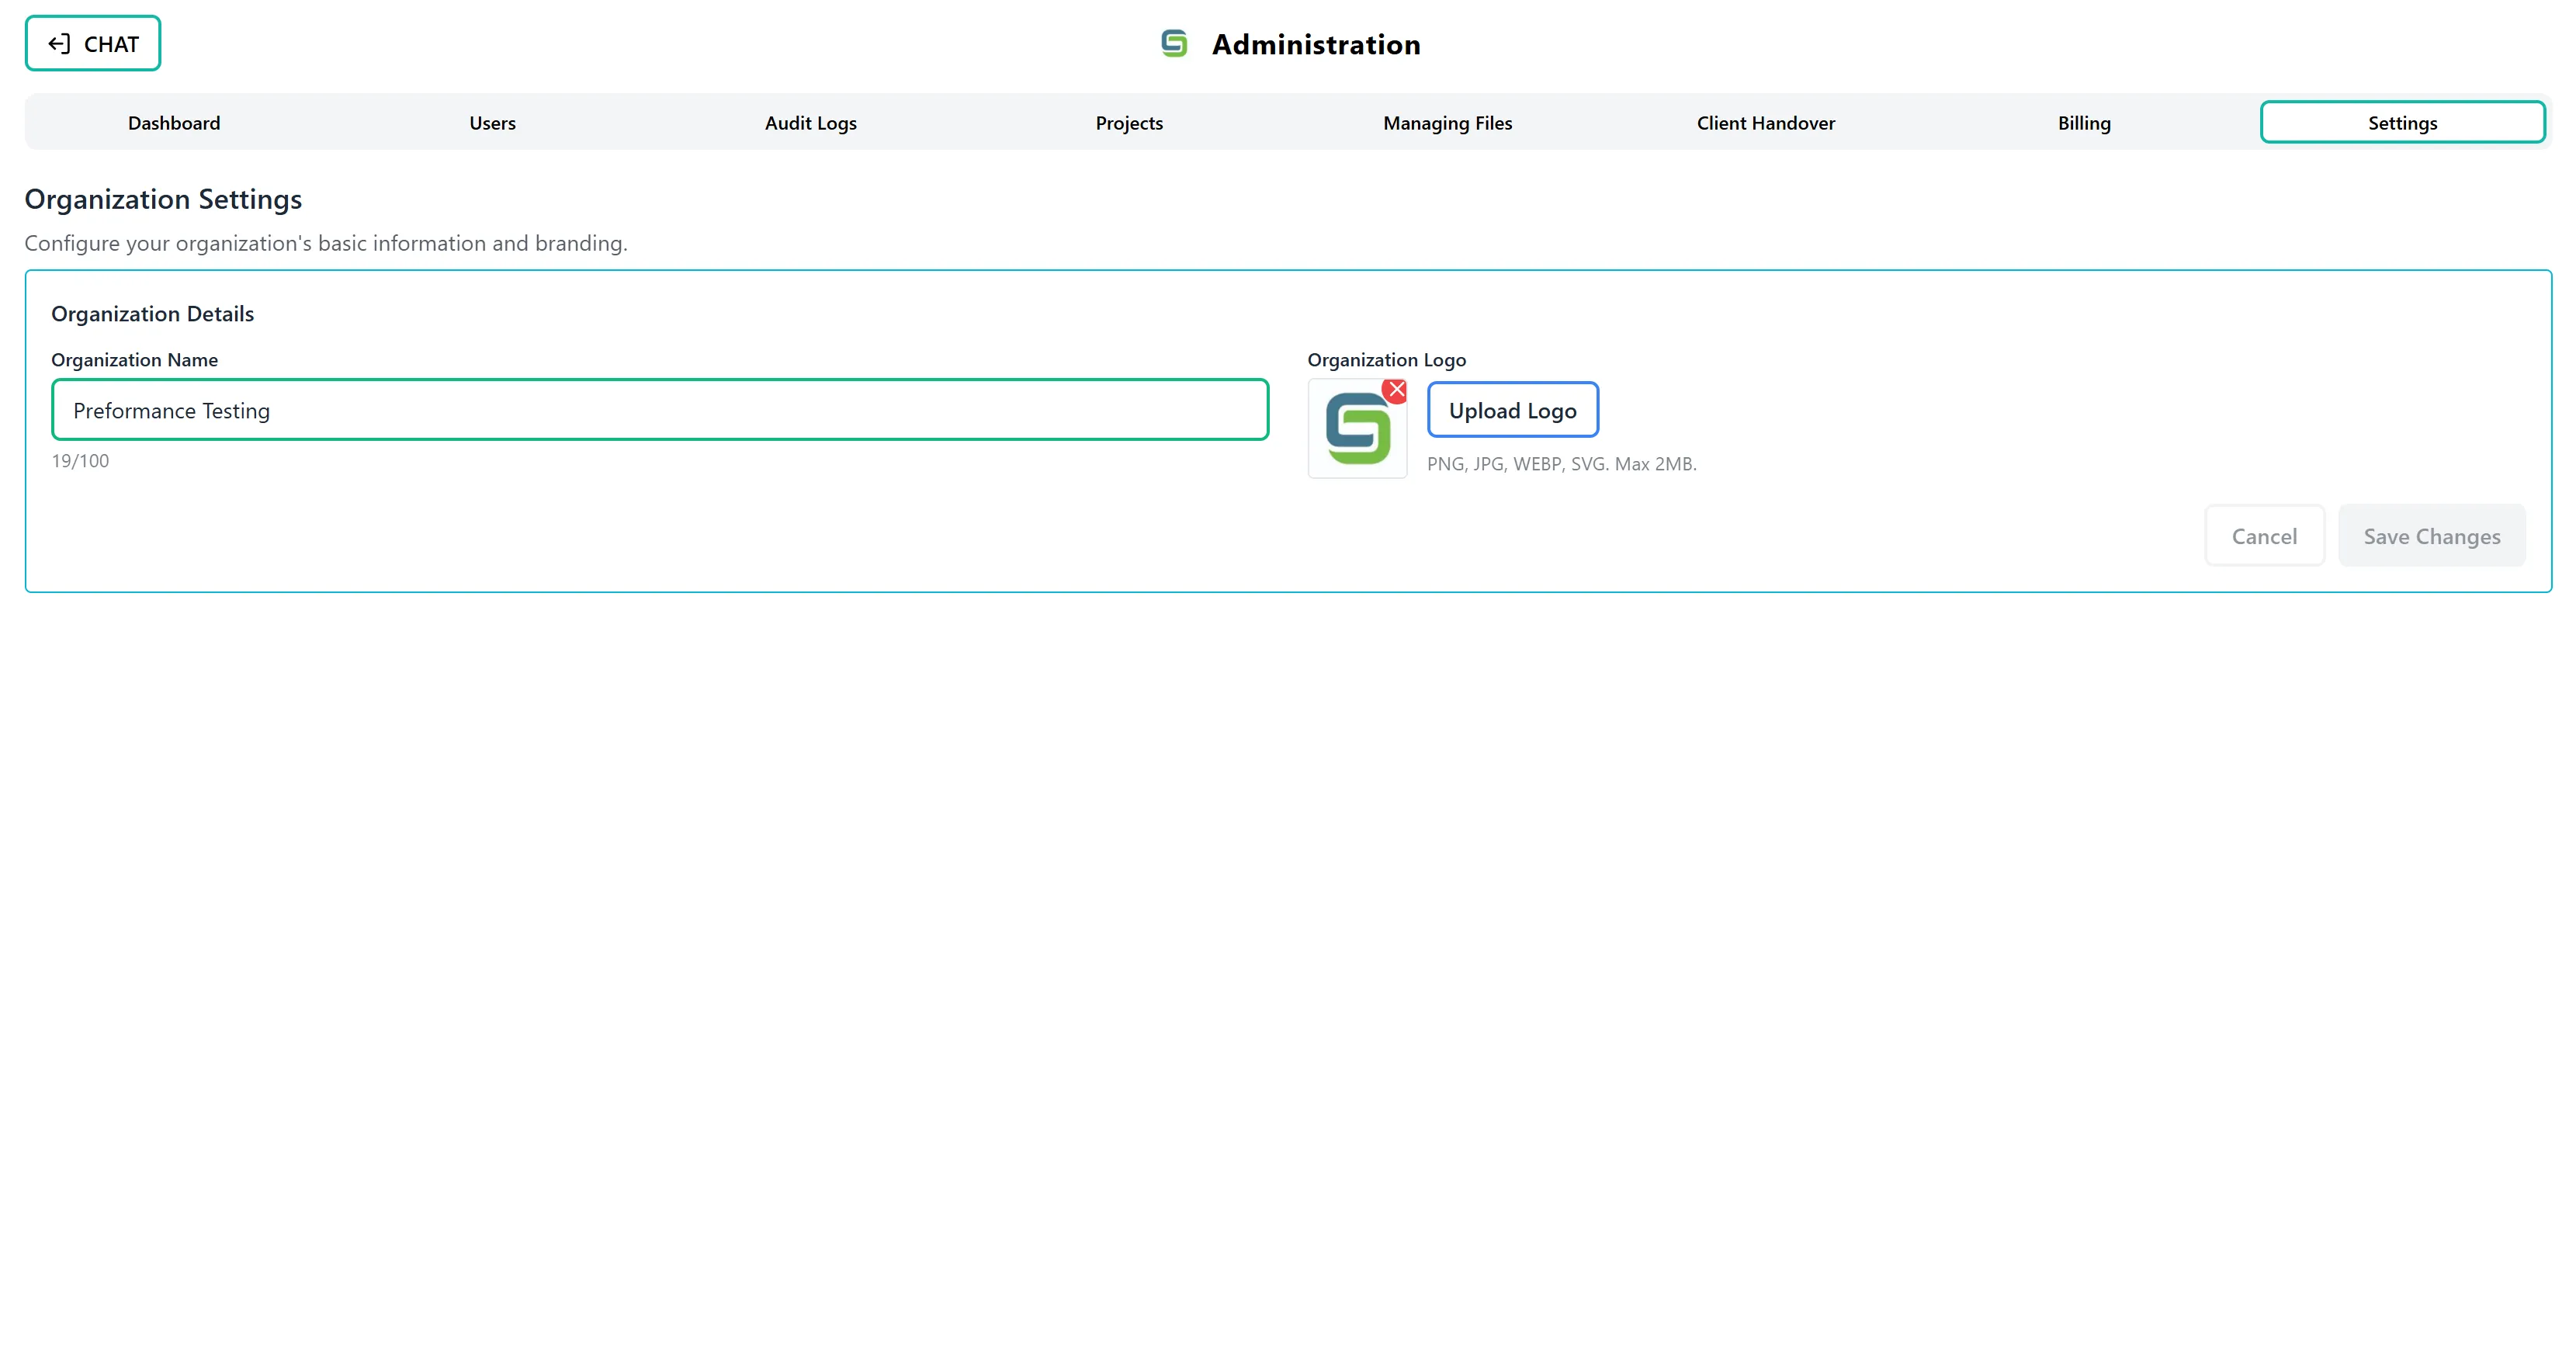
After accessing the Settings tab, you will see the Organization Settings interface:
Main Components:
- Header Section: Displays “Organization Settings” title and description
- Organization Details Form: Contains fields for organization name and logo
- Organization Name Field: Text input for editing the organization name
- Logo Preview: Displays current logo or placeholder icon
- Upload/Change Logo Button: Button to upload or change the organization logo
- Action Buttons: Cancel and Save Changes buttons at the bottom
Status Indicators:
- Loading State: Shows “Loading organization settings…” when data is being fetched
- Saving State: Shows “Saving organization settings…” when changes are being saved
- Error Messages: Displays error messages in red if something goes wrong
- Success State: Shows “Saved” when changes are successfully saved
Viewing Current Organization Information
Section titled “Viewing Current Organization Information”Step 1: Review Organization Name
Section titled “Step 1: Review Organization Name”- The Organization Name field displays the current organization name
- The name is shown in a text input field
- You can see the character count below the field (e.g., “25/100”)
Step 2: Review Organization Logo
Section titled “Step 2: Review Organization Logo”- The Logo Preview area shows:
- Current logo image (if one is uploaded)
- Upload icon placeholder (if no logo is set)
- The logo is displayed in a 64x64 pixel square
- If a logo exists, you’ll see a small “X” button in the top-right corner to remove it
Step 3: Check Organization Status
Section titled “Step 3: Check Organization Status”- If no organization is found, you’ll see a message: “No organization found for this user”
- Contact your administrator if you see this message
Updating Organization Name
Section titled “Updating Organization Name”Step 1: Edit Organization Name
Section titled “Step 1: Edit Organization Name”- Locate the Organization Name field in the Organization Details form
- Click inside the text input field
- The field will become editable
- Type or modify the organization name
Step 2: Understand Name Validation
Section titled “Step 2: Understand Name Validation”Validation Rules:
- Minimum Length: 1 character
- Maximum Length: 100 characters
- Allowed Characters: Letters (a-z, A-Z), numbers (0-9), and spaces
- Not Allowed: Special characters, symbols, or punctuation
Visual Feedback:
- Valid Name: Border appears green, character count shows (e.g., “25/100”)
- Invalid Name: Border appears red, error message shows: “Only alphanumeric and spaces, max 100 chars.”
Step 3: Review Name Changes
Section titled “Step 3: Review Name Changes”- As you type, the character count updates in real-time
- The Save Changes button becomes enabled when:
- The name is valid
- The name has changed from the original
- There are no errors
Step 4: Save Name Changes
Section titled “Step 4: Save Name Changes”- After making changes, click the “Save Changes” button
- A confirmation dialog will appear asking: “Are you sure you want to Save?”
- Click “Yes, Save” to confirm or “No” to cancel
- The organization name will be updated
- A success message will appear, and the form will refresh
Uploading Organization Logo
Section titled “Uploading Organization Logo”Step 1: Prepare Your Logo File
Section titled “Step 1: Prepare Your Logo File”File Requirements:
- Supported Formats: PNG, JPG, WEBP, SVG
- Maximum File Size: 2 MB
- Recommended Dimensions: Square format (e.g., 512x512 pixels) for best results
Step 2: Click Upload Logo Button
Section titled “Step 2: Click Upload Logo Button”- Locate the “Upload Logo” button next to the logo preview area
- Click the “Upload Logo” button
- A file picker dialog will open
Step 3: Select Logo File
Section titled “Step 3: Select Logo File”- Navigate to the location of your logo file
- Select the logo file you want to upload
- Click “Open” or “Select” to choose the file
Step 4: Preview Logo
Section titled “Step 4: Preview Logo”- After selecting the file, a preview will appear in the logo preview area
- The button text will change to “Change Logo”
- Verify the logo looks correct in the preview
Step 5: Handle Upload Errors
Section titled “Step 5: Handle Upload Errors”Common Errors:
- “Invalid file type”: File format is not supported (must be PNG, JPG, WEBP, or SVG)
- “File too large”: File exceeds 2 MB limit
- “Failed to upload logo”: Network or server error occurred
Solutions:
- Convert the file to a supported format if needed
- Compress the image to reduce file size
- Try uploading again if a network error occurred
Step 6: Save Logo Upload
Section titled “Step 6: Save Logo Upload”- After selecting a valid logo file, click the “Save Changes” button
- A confirmation dialog will appear
- Click “Yes, Save” to confirm
- The logo will be uploaded and saved
- A success message will appear
Changing Organization Logo
Section titled “Changing Organization Logo”Step 1: Access Change Logo Option
Section titled “Step 1: Access Change Logo Option”- If a logo already exists, the button will show “Change Logo” instead of “Upload Logo”
- Click the “Change Logo” button
- A file picker dialog will open
Step 2: Select New Logo
Section titled “Step 2: Select New Logo”- Navigate to the location of your new logo file
- Select the new logo file
- Click “Open” or “Select”
Step 3: Preview New Logo
Section titled “Step 3: Preview New Logo”- The preview will update to show the new logo
- The old logo will be replaced when you save
- Verify the new logo looks correct
Step 4: Save Logo Change
Section titled “Step 4: Save Logo Change”- Click the “Save Changes” button
- Confirm the change in the dialog
- The new logo will replace the old one
Removing Organization Logo
Section titled “Removing Organization Logo”Step 1: Access Remove Logo Option
Section titled “Step 1: Access Remove Logo Option”- If a logo exists, you’ll see a small “X” button in the top-right corner of the logo preview
- Click the “X” button
- A confirmation dialog will appear
![]()
Step 2: Confirm Logo Deletion
Section titled “Step 2: Confirm Logo Deletion”- The dialog will display:
- Title: “Delete Organization Logo”
- Warning message about permanent removal
- Text input field requiring confirmation
Step 3: Type Confirmation Text
Section titled “Step 3: Type Confirmation Text”- To confirm deletion, you must type “CONFIRM” (in uppercase) in the confirmation field
- The Delete Logo button will remain disabled until you type the exact text
- This prevents accidental deletions
Step 4: Execute Logo Deletion
Section titled “Step 4: Execute Logo Deletion”- After typing “CONFIRM”, the “Delete Logo” button will become enabled
- Click the “Delete Logo” button
- The system will:
- Permanently remove the logo from the organization
- Update the logo preview to show the placeholder icon
- Display a success message
- The confirmation dialog will close automatically
Step 5: Cancel Logo Deletion
Section titled “Step 5: Cancel Logo Deletion”- If you change your mind, click the “Cancel” button
- The dialog will close without deleting the logo
- The logo will remain unchanged
Saving Changes
Section titled “Saving Changes”Step 1: Review All Changes
Section titled “Step 1: Review All Changes”- Before saving, review:
- Organization name changes
- Logo upload or changes
- Any error messages
Step 2: Verify Changes Are Valid
Section titled “Step 2: Verify Changes Are Valid”Requirements for Saving:
- Organization name must be valid (1-100 characters, alphanumeric and spaces only)
- Logo file (if uploaded) must be valid format and size
- No error messages displayed
Step 3: Click Save Changes
Section titled “Step 3: Click Save Changes”- Click the “Save Changes” button at the bottom of the form
- The button will be disabled if:
- No changes have been made
- Organization name is invalid
- Logo upload has errors
Step 4: Confirm Save Action
Section titled “Step 4: Confirm Save Action”- A confirmation dialog will appear: “Are you sure you want to Save?”
- Review the changes you’re about to save
- Click “Yes, Save” to confirm or “No” to cancel
Step 5: Wait for Save to Complete
Section titled “Step 5: Wait for Save to Complete”- While saving, you’ll see:
- “Saving organization settings…” message
- Save button shows “Saving…”
- All buttons are disabled
Step 6: Save Success Confirmation
Section titled “Step 6: Save Success Confirmation”- After successful save:
- Success message appears
- Save button shows “Saved” briefly
- Form refreshes with updated data
- Changes are immediately visible
Canceling Changes
Section titled “Canceling Changes”Step 1: Access Cancel Option
Section titled “Step 1: Access Cancel Option”- If you’ve made changes but don’t want to save them, click the “Cancel” button
- The Cancel button is located next to the Save Changes button
Step 2: Confirm Cancel Action
Section titled “Step 2: Confirm Cancel Action”- Clicking Cancel will:
- Revert organization name to original value
- Remove any uploaded logo preview
- Clear all unsaved changes
- Reset the form to its original state
Step 3: Changes Discarded
Section titled “Step 3: Changes Discarded”- All unsaved changes will be lost
- The form will return to the state it was in when you first opened it
- No confirmation dialog appears for cancel action
Key Features Summary
Section titled “Key Features Summary”Organization Management Features
Section titled “Organization Management Features”- Update Name: Change organization name with validation
- Upload Logo: Add organization logo with file validation
- Change Logo: Replace existing logo with a new one
- Remove Logo: Delete organization logo with confirmation
- Save Changes: Persist all changes with confirmation
- Cancel Changes: Discard unsaved modifications
Validation Features
Section titled “Validation Features”- Name Validation: Enforces character limits and allowed characters
- File Type Validation: Ensures only supported image formats
- File Size Validation: Prevents files exceeding 2 MB
- Real-time Feedback: Shows validation errors immediately
Security Features
Section titled “Security Features”- Confirmation Dialogs: Requires confirmation for save and delete actions
- Delete Confirmation: Requires typing “CONFIRM” to delete logo
- Audit Logging: All changes are logged in the audit trail
Best Practices
Section titled “Best Practices”Before Making Changes
Section titled “Before Making Changes”- Plan Your Changes: Decide on organization name and logo before making changes
- Prepare Logo File: Ensure logo file meets requirements (format, size) before uploading
- Backup Current Logo: Download current logo if you want to keep a copy before changing
- Review Current Settings: Check current organization name and logo before editing
When Uploading Logos
Section titled “When Uploading Logos”- Use High-Quality Images: Upload logos in high resolution for best display
- Square Format: Use square logos (1:1 aspect ratio) for consistent display
- Optimize File Size: Compress images to reduce file size while maintaining quality
- Test Preview: Always preview the logo before saving to ensure it looks correct
When Updating Names
Section titled “When Updating Names”- Keep It Professional: Use clear, professional organization names
- Check Character Count: Stay within the 100 character limit
- Avoid Special Characters: Stick to letters, numbers, and spaces
- Verify Spelling: Double-check spelling before saving
Security Considerations
Section titled “Security Considerations”- Admin Only: Only admins can access and modify organization settings
- Audit Trail: All changes are logged for security and compliance
- Confirmation Required: Important actions require confirmation to prevent accidents
- Regular Review: Periodically review organization settings for accuracy
Troubleshooting
Section titled “Troubleshooting”Issue: Cannot Save Changes
Section titled “Issue: Cannot Save Changes”Solutions:
- Check that organization name is valid (1-100 characters, alphanumeric and spaces only)
- Verify logo file (if uploaded) is valid format and under 2 MB
- Check for error messages displayed in red
- Ensure you have admin privileges
- Refresh the page and try again
Issue: Logo Upload Fails
Section titled “Issue: Logo Upload Fails”Solutions:
- Verify file format is PNG, JPG, WEBP, or SVG
- Check file size is under 2 MB
- Try compressing the image
- Check network connection
- Try a different file format
Issue: Organization Name Validation Error
Section titled “Issue: Organization Name Validation Error”Solutions:
- Remove any special characters or symbols
- Ensure name is between 1 and 100 characters
- Use only letters, numbers, and spaces
- Check for hidden characters or extra spaces
Issue: Logo Not Displaying After Upload
Section titled “Issue: Logo Not Displaying After Upload”Solutions:
- Refresh the page to reload the logo
- Check browser cache and clear if needed
- Verify the logo was saved successfully (check success message)
- Try uploading the logo again
Issue: Cannot Delete Logo
Section titled “Issue: Cannot Delete Logo”Solutions:
- Ensure you typed “CONFIRM” exactly (uppercase, no spaces)
- Check that you have admin privileges
- Refresh the page and try again
- Verify the logo exists before attempting deletion
Issue: Changes Not Saving
Section titled “Issue: Changes Not Saving”Solutions:
- Check network connection
- Verify you clicked “Yes, Save” in the confirmation dialog
- Check for error messages
- Ensure you have admin privileges
- Try refreshing the page and making changes again
Security Notes
Section titled “Security Notes”- Only users with admin privileges can access the Settings tab
- All organization settings changes are logged in the audit trail
- Logo deletions require typing “CONFIRM” to prevent accidental removal
- Save actions require confirmation to prevent accidental changes
- Organization name changes are immediately visible to all organization members
- Logo changes are immediately visible across the application
Related Features
Section titled “Related Features”Audit Logging
Section titled “Audit Logging”- Organization name changes are logged with old and new values
- Logo uploads are logged with file name and size
- Logo deletions are logged with timestamp
- All actions include admin email and timestamp
Cache Management
Section titled “Cache Management”- Organization name and logo are cached for performance
- Cache is automatically cleared when settings are updated
- Changes are immediately reflected across the application
Integration Points
Section titled “Integration Points”- Organization name appears in:
- Admin dashboard
- User invitations
- Email templates
- Application headers
- Organization logo appears in:
- Application branding
- Email templates
- User interface elements