Account Details Modal
This procedure guide explains how to use the Account Details Modal to manage your personal account settings, security preferences, and interaction defaults. The Account Details Modal allows you to update your profile information, configure security settings, customize your communication preferences, and adjust appearance settings.
Table of Contents
Section titled “Table of Contents”- Accessing the Account Details Modal
- Understanding the Modal Interface
- Account Tab - Profile Information
- Security Tab - Two-Factor Authentication
- Security Tab - Password Management
- Preferences Tab - Interaction Defaults
- Appearance Tab - Theme Settings
- Notifications Tab
- Privacy Tab
- Logging Out
Accessing the Account Details Modal
Section titled “Accessing the Account Details Modal”Step 1: Locate Access Points
Section titled “Step 1: Locate Access Points”The Account Details Modal can be accessed from the Chat Sidebar:
- In the chat sidebar, locate your profile section at the bottom
- Click on your profile avatar or “Account Details & Security” text
- The Account Details Modal will open
Understanding the Modal Interface
Section titled “Understanding the Modal Interface”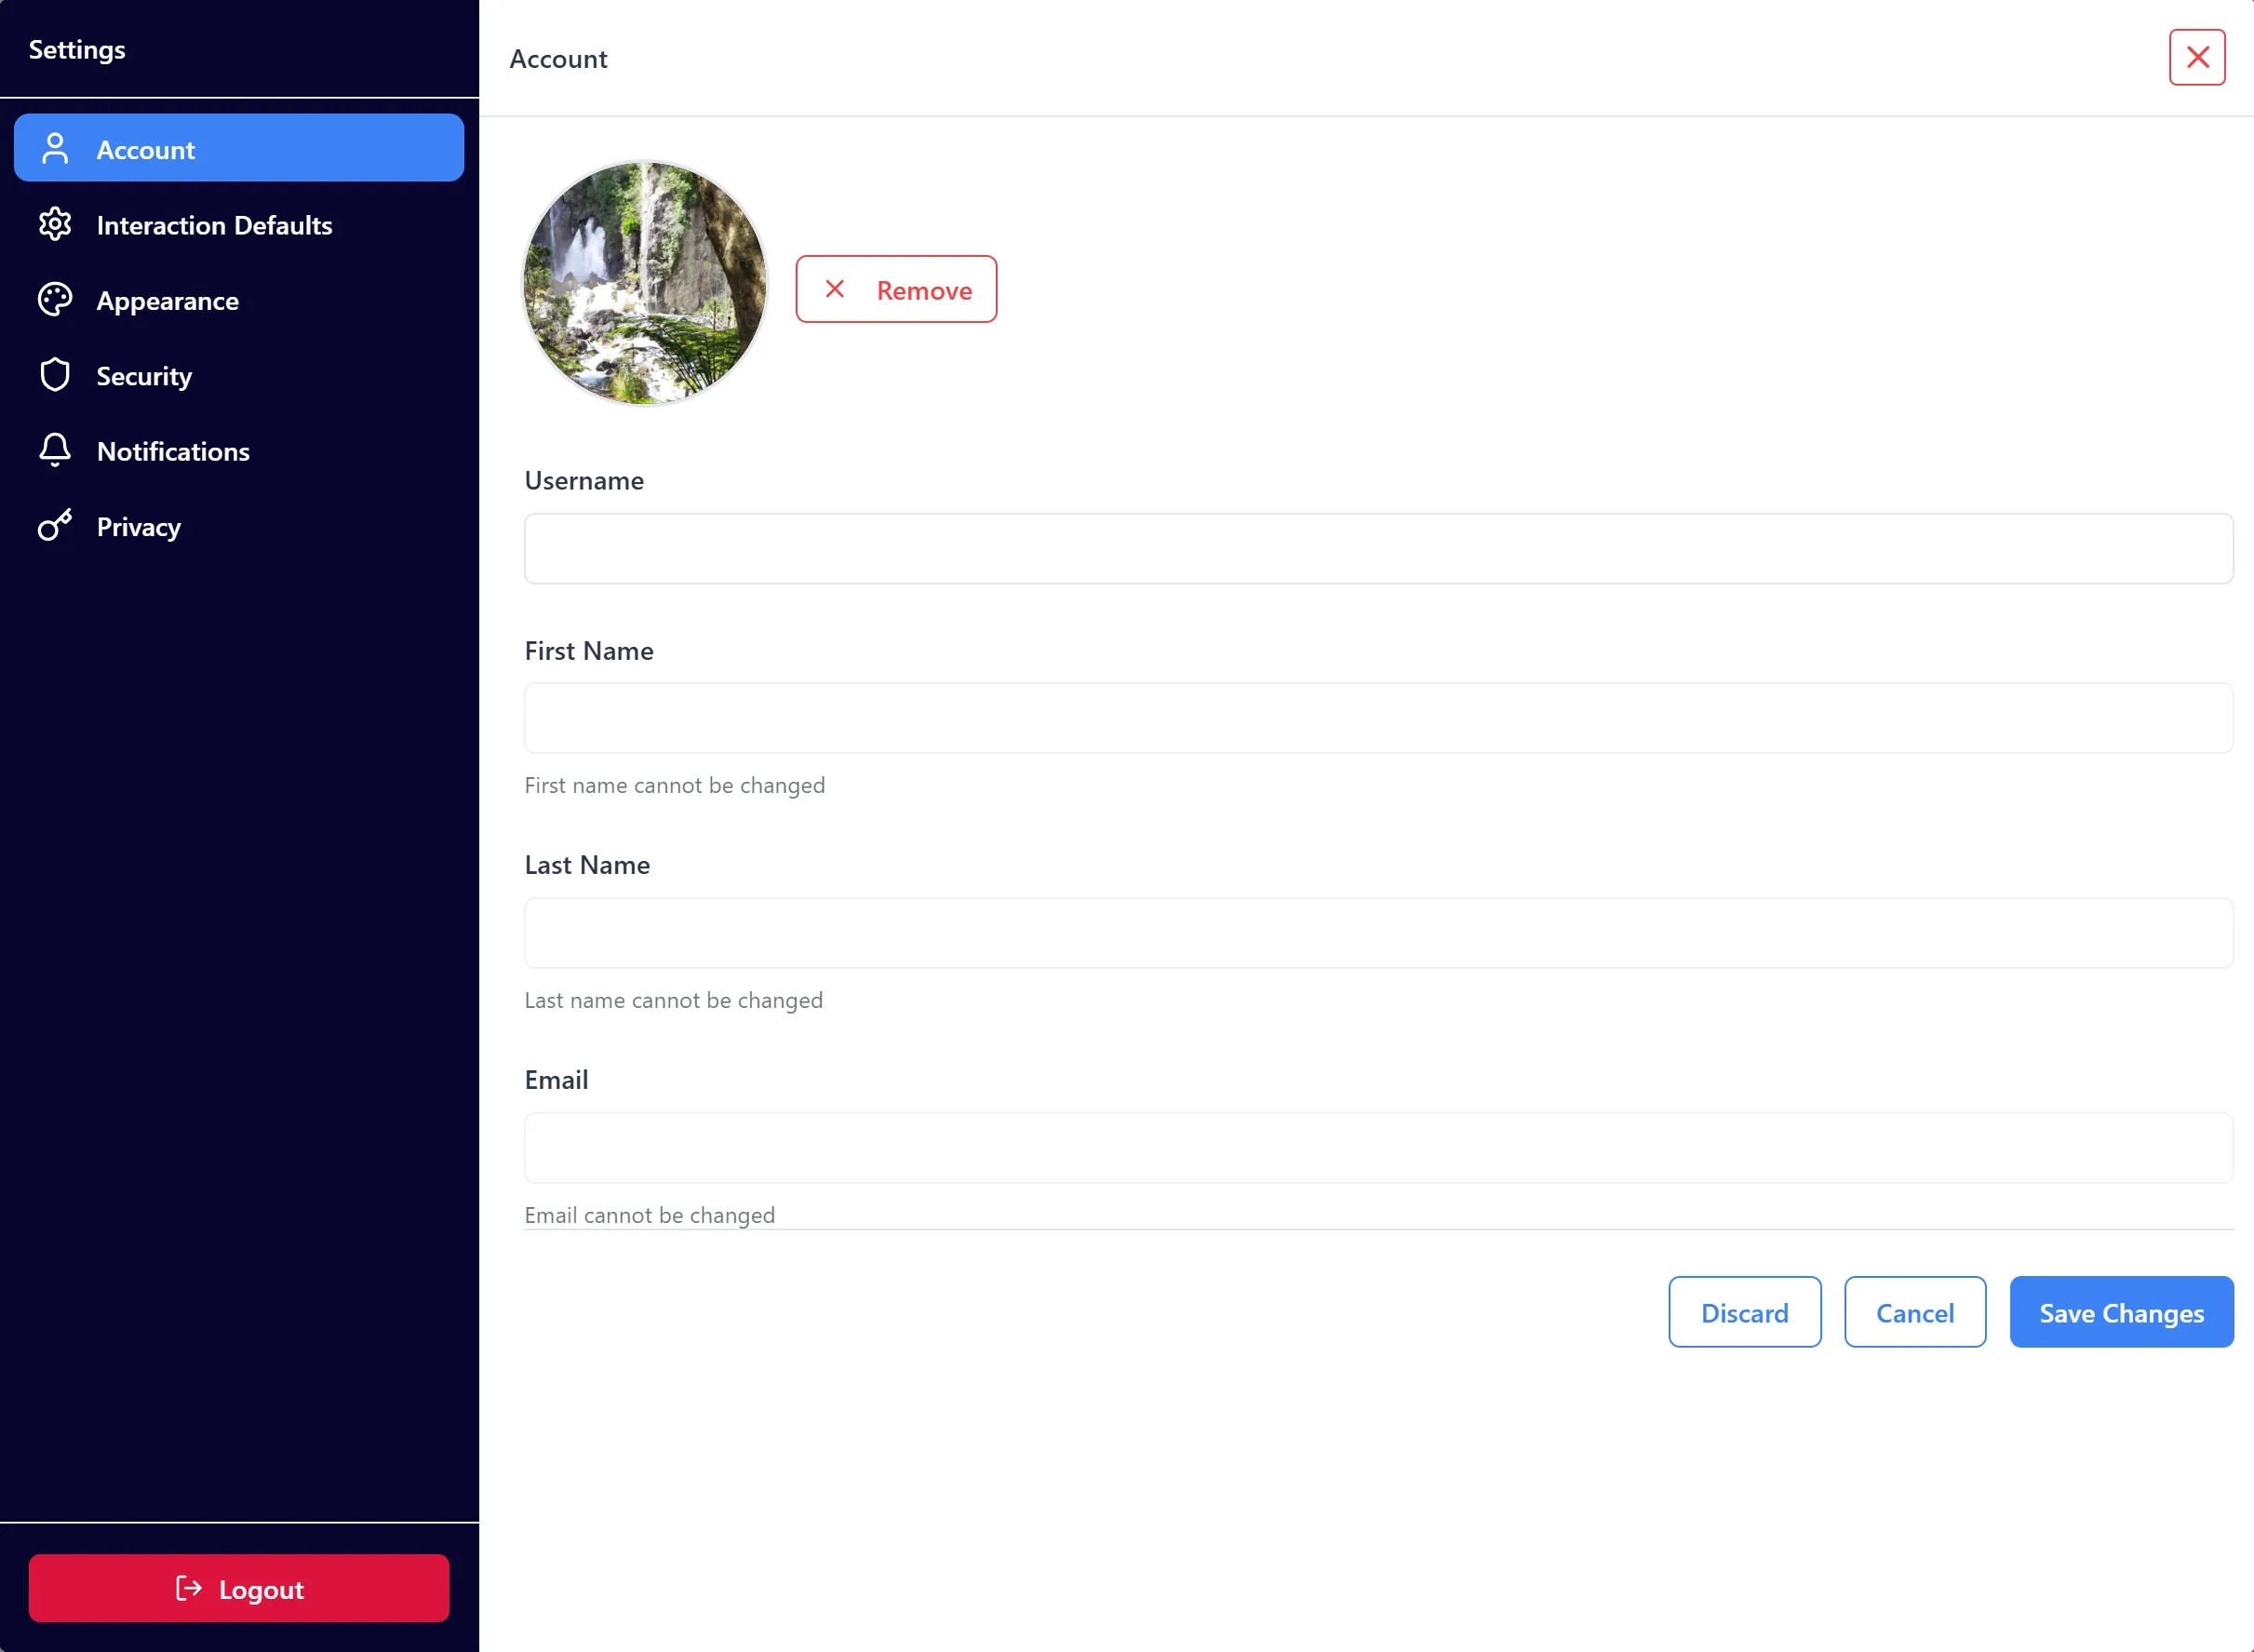
After opening the Account Details Modal, you will see a two-panel interface:
Left Sidebar (Navigation):
- Settings Header: “Settings” title at the top
- Navigation Tabs: Six tabs for different settings categories:
- Account: Profile information and avatar
- Interaction Defaults: Communication preferences
- Appearance: Theme selection
- Security: Two-factor authentication and password
- Notifications: Notification settings (coming soon)
- Privacy: Privacy settings (coming soon)
- Logout Button: Red button at the bottom to sign out
Right Content Area:
- Tab Header: Shows the current tab name and close button (X)
- Scrollable Content: Main content area for the selected tab
- Action Buttons: Save, Cancel, or Discard buttons (varies by tab)
Modal Features:
- Click Outside to Close: Clicking the dark overlay closes the modal
- Close Button: Red X button in the top-right corner
- Tab Navigation: Click any tab in the left sidebar to switch sections
- Responsive Design: Modal adapts to different screen sizes
Account Tab - Profile Information
Section titled “Account Tab - Profile Information”Step 1: View Account Tab
Section titled “Step 1: View Account Tab”- The Account tab is selected by default when the modal opens
- If not selected, click “Account” in the left sidebar
- The Account tab displays your profile information
Step 2: Upload or Change Avatar
Section titled “Step 2: Upload or Change Avatar”- Locate the avatar section at the top of the Account tab
- Your current avatar (or default avatar) is displayed
- Click the “Upload” or “Change” button
- A file picker dialog will open
- Select an image file from your computer
- The avatar will update immediately after selection
Avatar Requirements:
- Supported Formats: Common image formats (JPG, PNG, etc.)
- Recommended Size: Square images work best
- File Size: Reasonable file sizes are recommended
Step 3: Update Username
Section titled “Step 3: Update Username”- Locate the Username field
- Click inside the text input field
- Type your desired username
- The field validates as you type
Username Validation:
- Allowed Characters: Letters, spaces, apostrophes, and hyphens
- Minimum Length: At least one character
- Error Messages:
- “Username must be at least one character long” (if empty)
- “Only letters, spaces, apostrophes, and hyphens are allowed” (if invalid characters)
Visual Feedback:
- Valid Username: No error message, Save button enabled
- Invalid Username: Red error message appears below field
Step 4: View Read-Only Information
Section titled “Step 4: View Read-Only Information”The following fields are read-only and cannot be changed:
- First Name: Displays your first name (grayed out)
- Last Name: Displays your last name (grayed out)
- Email: Displays your email address (grayed out)
Note: These fields show a message: “First name cannot be changed”, “Last name cannot be changed”, or “Email cannot be changed”
Step 5: Save Account Changes
Section titled “Step 5: Save Account Changes”- After making changes (username or avatar), review your updates
- Click the “Save Changes” button at the bottom
- The system will:
- Update your username in the database
- Update your avatar
- Display a success message
- Close the modal automatically
Step 6: Discard or Cancel Changes
Section titled “Step 6: Discard or Cancel Changes”Discard Changes:
- Click the “Discard” button to revert all changes
- Your username will revert to the original value
- The modal will close
Cancel:
- Click the “Cancel” button
- The modal will close without saving changes
- Your changes will be lost
Security Tab - Two-Factor Authentication
Section titled “Security Tab - Two-Factor Authentication”Step 1: Access Security Tab
Section titled “Step 1: Access Security Tab”- Click “Security” in the left sidebar
- The Security tab will display security options
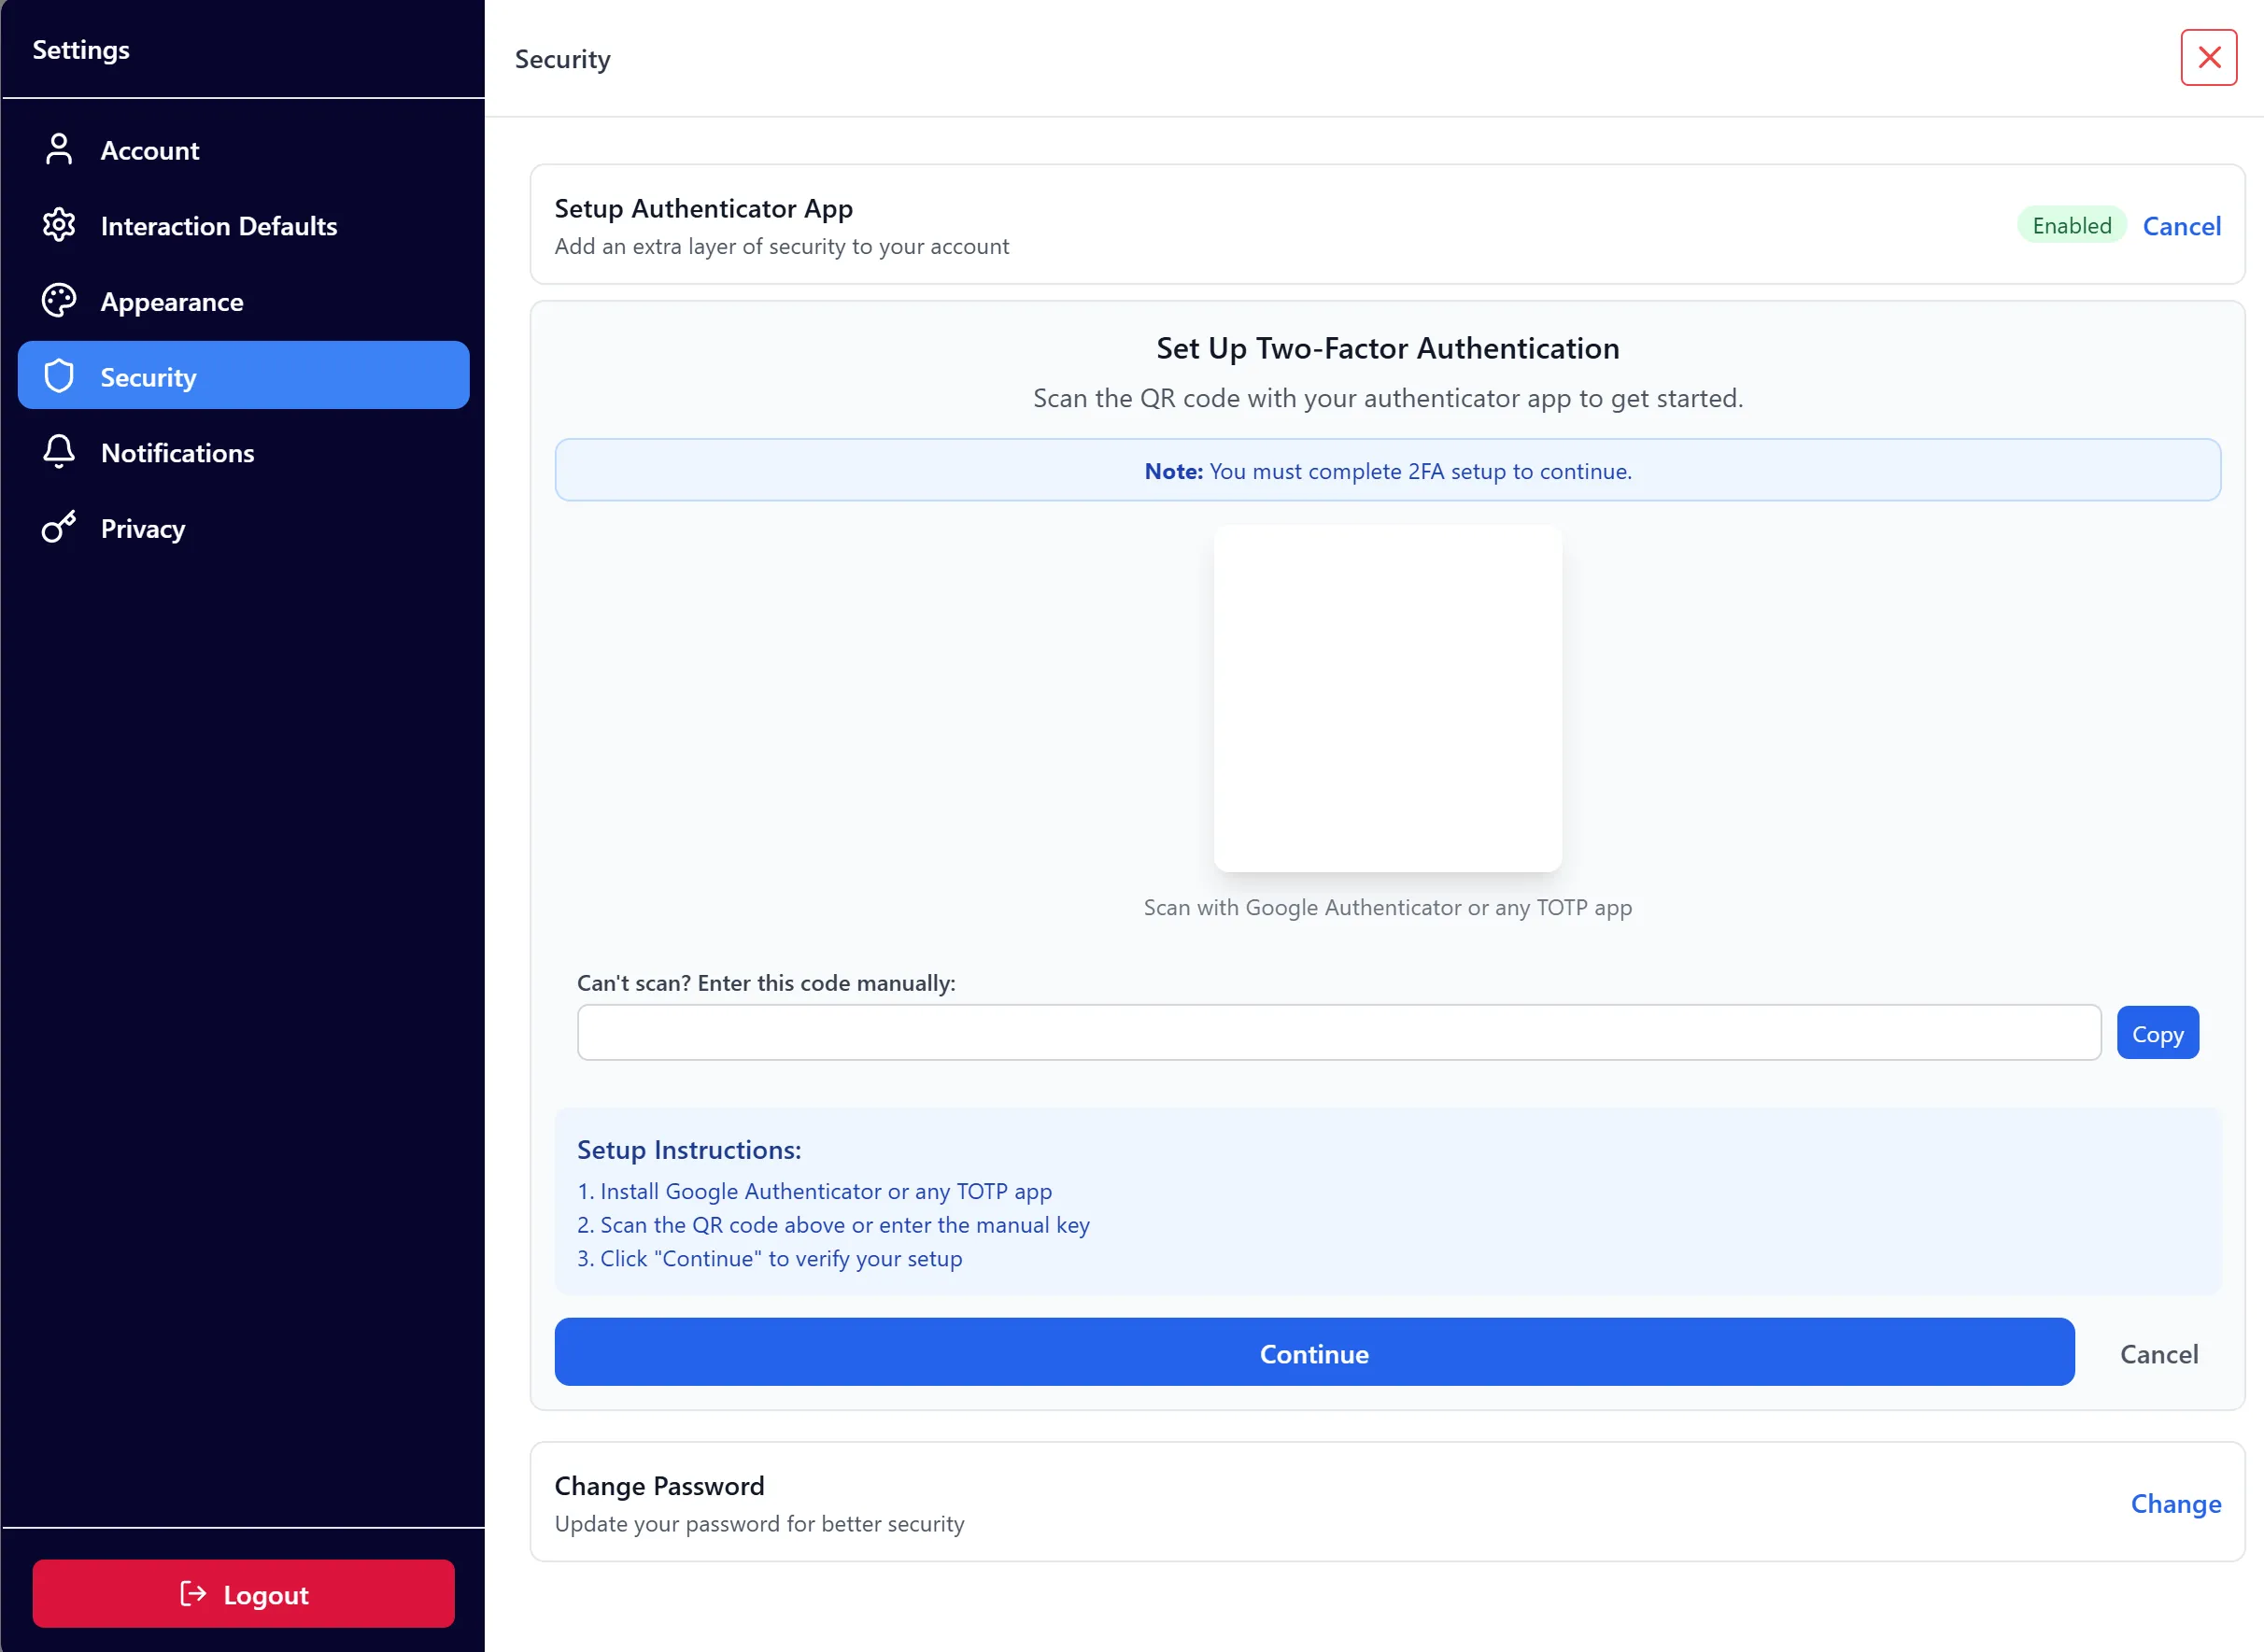
Step 2: View 2FA Status
Section titled “Step 2: View 2FA Status”- Locate the “Setup Authenticator App” section
- You’ll see the current 2FA status:
- “Enabled” (green badge) - 2FA is active
- “Disabled” (gray badge) - 2FA is not set up
Step 3: Set Up Two-Factor Authentication
Section titled “Step 3: Set Up Two-Factor Authentication”If 2FA is Required:
- If 2FA setup is required, you’ll see a blue banner at the top
- The banner states: “You must set up two-factor authentication to continue using your account”
- Other tabs will be disabled until 2FA is completed
- You cannot switch away from the Security tab
Step 3a: Start 2FA Setup
- Click the “Setup” button next to “Setup Authenticator App”
- A setup panel will expand below
- The system will generate a QR code and secret key
Step 3b: Scan QR Code
- Install an authenticator app on your mobile device:
- Google Authenticator
- Microsoft Authenticator
- Any TOTP-compatible app
- Open the authenticator app
- Scan the QR code displayed in the modal
- The app will add your account
Step 3c: Manual Entry (Alternative)
- If you can’t scan the QR code, use the manual entry key
- The key is displayed in a text field below the QR code
- Click “Copy” to copy the key to your clipboard
- Manually enter the key into your authenticator app
Step 3d: Continue to Verification
- After scanning or entering the key, click “Continue”
- You’ll proceed to the verification step
- If 2FA is not required, you can click “Cancel” to close the setup
Step 4: Verify 2FA Setup
Section titled “Step 4: Verify 2FA Setup”Step 4a: Enter Verification Code
- In the verification step, you’ll see an input field
- Open your authenticator app
- Find the 6-digit code for “Preformance AI”
- Enter the 6-digit code in the verification field
- The code updates automatically as you type
Step 4b: Submit Verification
- Click “Verify & Complete Setup” button
- The system will verify your code
- If successful:
- 2FA will be enabled
- Status badge changes to “Enabled” (green)
- Setup panel closes
- You can now access other tabs (if previously restricted)
Step 4c: Handle Verification Errors
- Invalid Code: Error message appears: “Invalid verification code. Please try again.”
- Network Error: Error message appears: “An error occurred. Please try again.”
- Solution: Wait for a new code (codes refresh every 30 seconds) and try again
Step 5: Back to Setup (If Needed)
Section titled “Step 5: Back to Setup (If Needed)”- If verification fails, click “Back” button
- You’ll return to the QR code setup step
- You can scan the QR code again or use manual entry
Security Tab - Password Management
Section titled “Security Tab - Password Management”Step 1: Access Change Password
Section titled “Step 1: Access Change Password”- In the Security tab, locate the “Change Password” section
- Click the “Change” button
- Note: Password change functionality may redirect to a separate page or show a placeholder
Current Status:
- The “Change Password” option is available but may require additional implementation
- Contact support if you need to change your password
Preferences Tab - Interaction Defaults
Section titled “Preferences Tab - Interaction Defaults”Step 1: Access Preferences Tab
Section titled “Step 1: Access Preferences Tab”- Click “Interaction Defaults” in the left sidebar
- The Preferences tab will display interaction settings
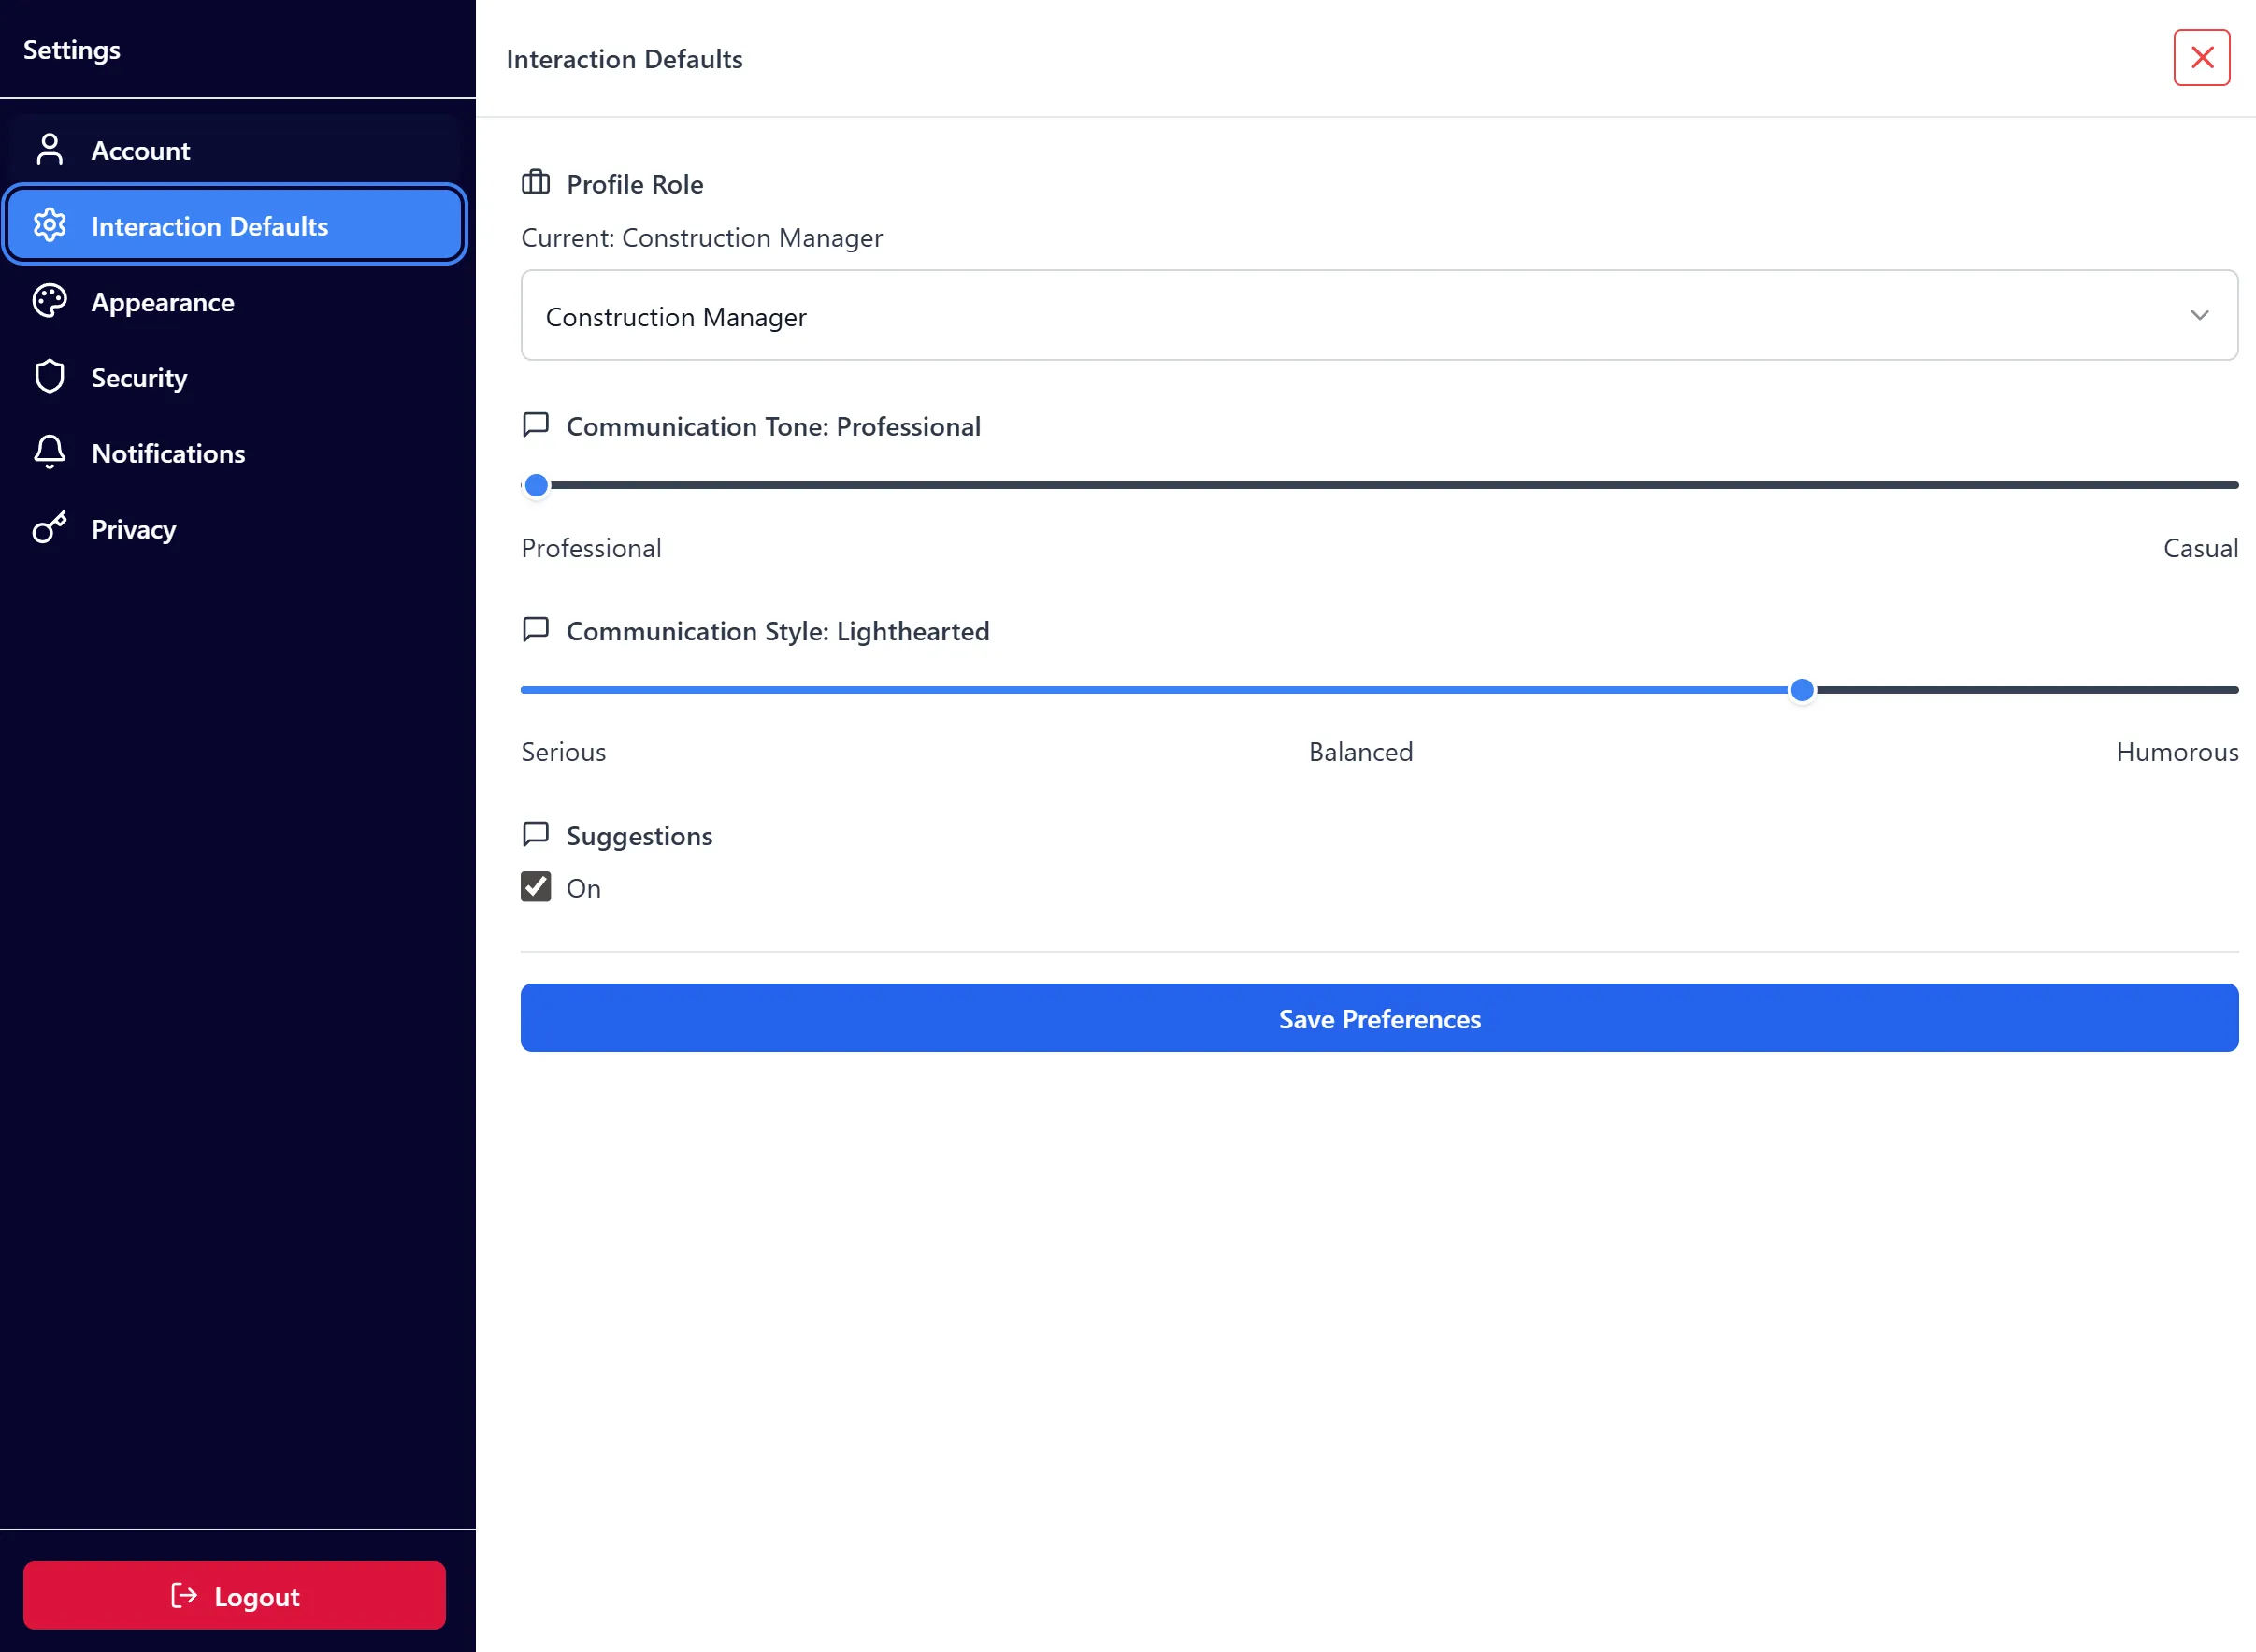
Step 2: Set Profile Role
Section titled “Step 2: Set Profile Role”- Locate the “Profile Role” section
- You’ll see your current role displayed: “Current: [Your Role]”
- Click the role dropdown menu
- Select from available roles:
- Construction Manager
- Director of Construction Technology
- Compliance Expert
- Air Conditioning Electrician
- The role updates immediately when selected
Role Purpose:
- The profile role affects how the AI interacts with you
- Different roles may receive different types of responses
- Changes are saved automatically
Step 3: Adjust Communication Tone
Section titled “Step 3: Adjust Communication Tone”- Locate the “Communication Tone” slider
- The current tone is displayed: “Communication Tone: Professional” or “Casual”
- Drag the slider to adjust:
- Left (0): Professional
- Right (1): Casual
- The tone updates immediately as you move the slider
Tone Options:
- Professional: Formal, business-like communication
- Casual: Relaxed, friendly communication
Step 4: Adjust Communication Style
Section titled “Step 4: Adjust Communication Style”- Locate the “Communication Style” slider
- The current style is displayed: “Communication Style: [Current Style]”
- Drag the slider to adjust (increments of 25):
- 0: Serious
- 25: Reserved
- 50: Balanced
- 75: Lighthearted
- 100: Humorous
- The style updates immediately as you move the slider
Style Options:
- Serious: Formal and focused responses
- Reserved: Professional but approachable
- Balanced: Mix of professional and friendly
- Lighthearted: Friendly and relaxed
- Humorous: Playful and entertaining
Step 5: Toggle Suggestions
Section titled “Step 5: Toggle Suggestions”- Locate the “Suggestions” section
- Check or uncheck the checkbox to enable/disable suggestions
- The status shows “On” or “Off” next to the checkbox
Suggestions Feature:
- When enabled, suggested actions are shown in the interface
- Suggestions help guide you through common tasks
- You can toggle this on or off at any time
Step 6: Save Preferences
Section titled “Step 6: Save Preferences”- After adjusting your preferences, click the “Save Preferences” button at the bottom
- The system will:
- Save all preference changes to the database
- Update both global and organization-specific settings
- Close the modal automatically
- Your preferences will be applied immediately
Note: Some changes (like role, tone, style) update immediately as you adjust them, but clicking “Save Preferences” ensures all changes are persisted.
Appearance Tab - Theme Settings
Section titled “Appearance Tab - Theme Settings”Step 1: Access Appearance Tab
Section titled “Step 1: Access Appearance Tab”- Click “Appearance” in the left sidebar
- The Appearance tab will display theme options
Step 2: Select Theme
Section titled “Step 2: Select Theme”- Locate the “Theme” dropdown menu
- Click the dropdown to see available themes
- Select from available options:
- Light (default): Light color scheme
- Dark: Dark color scheme
- Accessible: Colorblind-friendly theme
- The theme applies immediately when selected
Theme Options:
- Light: Default light theme with standard colors
- Dark: Dark theme for reduced eye strain
- Accessible: Optimized for colorblind users
Step 3: Preview Theme
Section titled “Step 3: Preview Theme”- After selecting a theme, the interface will update immediately
- You can see the changes in real-time
- The modal itself will reflect the new theme
Step 4: Save Appearance Settings
Section titled “Step 4: Save Appearance Settings”- After selecting your preferred theme, click “Save Appearance Settings” button
- The system will:
- Save the theme preference to the database
- Update both global and organization-specific settings
- Close the modal automatically
- Your theme preference will persist across sessions
Notifications Tab
Section titled “Notifications Tab”Step 1: Access Notifications Tab
Section titled “Step 1: Access Notifications Tab”- Click “Notifications” in the left sidebar
- The Notifications tab will display
Step 2: Current Status
Section titled “Step 2: Current Status”- You’ll see a message: “Notification settings coming soon”
- This feature is currently under development
- Check back later for notification preferences
Future Features:
- Email notification preferences
- In-app notification settings
- Notification frequency controls
Privacy Tab
Section titled “Privacy Tab”Step 1: Access Privacy Tab
Section titled “Step 1: Access Privacy Tab”- Click “Privacy” in the left sidebar
- The Privacy tab will display
Step 2: Current Status
Section titled “Step 2: Current Status”- You’ll see a message: “Privacy settings coming soon”
- This feature is currently under development
- Check back later for privacy preferences
Future Features:
- Data sharing preferences
- Privacy controls
- Account visibility settings
Logging Out
Section titled “Logging Out”Step 1: Access Logout Button
Section titled “Step 1: Access Logout Button”- Locate the “Logout” button at the bottom of the left sidebar
- The button is red with a logout icon
- It’s always visible regardless of which tab is active
Step 2: Confirm Logout
Section titled “Step 2: Confirm Logout”- Click the “Logout” button
- You will be signed out of your account immediately
- You’ll be redirected to the login page or home page
Logout Behavior:
- Session is terminated immediately
- All local session data is cleared
- You’ll need to log in again to access your account
Key Features Summary
Section titled “Key Features Summary”Account Management Features
Section titled “Account Management Features”- Avatar Upload: Upload or change your profile picture
- Username Update: Change your username with validation
- Profile Viewing: View your first name, last name, and email (read-only)
Security Features
Section titled “Security Features”- Two-Factor Authentication: Set up 2FA with QR code or manual entry
- 2FA Verification: Verify setup with 6-digit codes
- Password Management: Access password change options (when available)
Preference Management Features
Section titled “Preference Management Features”- Profile Role: Select your professional role
- Communication Tone: Adjust between Professional and Casual
- Communication Style: Set style from Serious to Humorous
- Suggestions Toggle: Enable or disable suggested actions
Appearance Features
Section titled “Appearance Features”- Theme Selection: Choose Light, Dark, or Accessible theme
- Real-time Preview: See theme changes immediately
- Persistent Settings: Theme preference saved across sessions
Navigation Features
Section titled “Navigation Features”- Tab Navigation: Easy switching between settings categories
- Direct Tab Access: Open modal to specific tabs
- Quick Close: Click outside or use close button
Best Practices
Section titled “Best Practices”Before Making Changes
Section titled “Before Making Changes”- Review Current Settings: Check your current preferences before changing them
- Understand Impact: Know how each setting affects your experience
- Test Changes: Try different settings to find what works best for you
When Setting Up 2FA
Section titled “When Setting Up 2FA”- Use Trusted Device: Set up 2FA on a device you always have access to
- Backup Codes: Save backup codes if provided
- Test Setup: Verify 2FA works before closing the modal
- Keep Authenticator App: Don’t delete your authenticator app after setup
When Adjusting Preferences
Section titled “When Adjusting Preferences”- Start with Defaults: Try default settings first, then adjust as needed
- Test Communication: Test how tone and style affect AI responses
- Save Regularly: Click “Save Preferences” after making changes
- Experiment: Don’t be afraid to try different combinations
When Changing Theme
Section titled “When Changing Theme”- Consider Environment: Choose a theme that works for your lighting conditions
- Test All Themes: Try each theme to see which you prefer
- Accessibility: Use the Accessible theme if you have color vision differences
Security Considerations
Section titled “Security Considerations”- Enable 2FA: Always enable two-factor authentication for better security
- Unique Username: Choose a username that’s unique but not too personal
- Regular Updates: Review your security settings periodically
- Secure Logout: Always log out when using shared devices
Troubleshooting
Section titled “Troubleshooting”Issue: Modal Won’t Open
Section titled “Issue: Modal Won’t Open”Solutions:
- Check that you’re logged in
- Refresh the page and try again
- Clear browser cache
- Try accessing from a different location (header vs sidebar)
Issue: Username Update Fails
Section titled “Issue: Username Update Fails”Solutions:
- Check username validation rules (letters, spaces, apostrophes, hyphens only)
- Ensure username is at least one character long
- Check for network connectivity
- Try again after a few moments
Issue: Avatar Upload Fails
Section titled “Issue: Avatar Upload Fails”Solutions:
- Check file format is supported (JPG, PNG, etc.)
- Ensure file size is reasonable
- Try a different image file
- Check network connectivity
Issue: 2FA QR Code Not Generating
Section titled “Issue: 2FA QR Code Not Generating”Solutions:
- Click “Retry QR Code Generation” button
- Use manual entry key instead
- Check network connectivity
- Refresh the page and try again
Issue: 2FA Verification Fails
Section titled “Issue: 2FA Verification Fails”Solutions:
- Ensure you’re entering the current 6-digit code (codes refresh every 30 seconds)
- Check that your device time is synchronized
- Wait for a new code and try again
- Verify you scanned the correct QR code
- Try using manual entry key instead
Issue: Preferences Not Saving
Section titled “Issue: Preferences Not Saving”Solutions:
- Click “Save Preferences” button explicitly
- Check network connectivity
- Refresh the page and try again
- Verify you have proper permissions
Issue: Theme Not Applying
Section titled “Issue: Theme Not Applying”Solutions:
- Click “Save Appearance Settings” button
- Refresh the page after saving
- Clear browser cache
- Check that theme is supported
Issue: Cannot Switch Tabs (2FA Required)
Section titled “Issue: Cannot Switch Tabs (2FA Required)”Solutions:
- Complete 2FA setup first
- You cannot switch tabs until 2FA is enabled
- Follow the 2FA setup process completely
- Contact support if 2FA setup continues to fail
Security Notes
Section titled “Security Notes”- 2FA Protection: Two-factor authentication significantly improves account security
- Username Privacy: Choose usernames that don’t reveal personal information
- Session Management: Always log out when using shared or public devices
- Settings Persistence: All settings are saved to your account and persist across devices
- Audit Logging: Account changes (like username) are logged in the audit trail
- Organization Settings: Some preferences (like theme) can be set per organization
Related Features
Section titled “Related Features”Integration Points
Section titled “Integration Points”- Header Integration: Modal accessible from main header
- Sidebar Integration: Modal accessible from chat sidebar
- Admin Integration: Modal accessible from admin pages
- Theme System: Appearance settings integrate with global theme system
Data Storage
Section titled “Data Storage”- Profile Data: Stored in
profilestable - Preferences: Stored in user settings and
user_org_settingstable - Theme: Stored in both global settings and organization-specific settings
- 2FA Secrets: Securely stored in backend database
Audit Logging
Section titled “Audit Logging”- Username Changes: Logged with old and new values
- Role Changes: Logged when profile role is updated
- 2FA Setup: Logged when 2FA is enabled
- Theme Changes: Tracked for analytics